Overview
One project I maintain is frequently targetted by DDoS attacks. The power behind each attack ranges from weak attacks (100 Mbps) to very strong attacks (100+ Gbps). This project is essentially a side project and as a result I cannot afford to set up expensive DDoS mitigation solutions with failover servers. I suspect there are many that also face the same situation. A long time ago I decided to do everything I could to hide my servers origin IP in hopes of preventing my cheap web server from being bombarded with malicious traffic. The results from these changes have been fantastic!
Below is a summary of all the changes I made to hide my servers origin IP address for this project.
CloudFlare
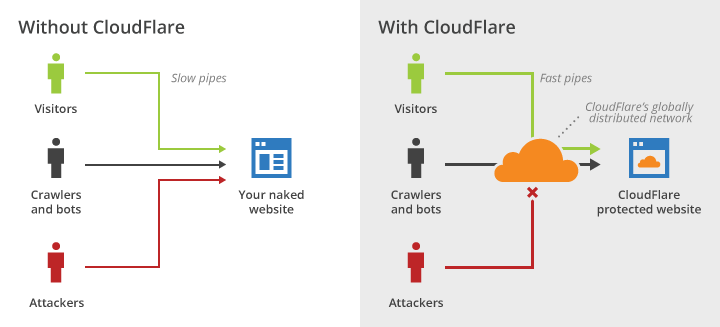
One of the first changes I made was moving over my website to CloudFlare. CloudFlare provided me with many benefits (and all for free!). Not only did CloudFlare mask my servers origin IP by routing requests from users to my server, they also reduced my overall bandwidth costs and provided fast file caching.
The primary reason I signed up to CloudFlare was to mask my servers origin IP. Instead of pointing my domain to my origin server, I instead point my domain towards CloudFlare’s servers. CloudFlare then forwards user request to my origin server and my origin server replies to CloudFlare with a response. Finally, CloudFlare sends the response back to the user. During the initial connection between the user and CloudFlare, CloudFlare can handle malicious traffic it detects and may present users with a CAPTCHA to verify they are human. If the checks fail the request is denied and the traffic never reaches your origin server.
Firewall Whitelisting
Now that CloudFlare is set up and working, our web server should only be contacted by CloudFlare (and perhaps other services you use). SSH into your server and configure your firewall to only allow CloudFlare IP’s inbound/outbound access. CloudFlare’s IP ranges are available here and rarely change.
HTTPs
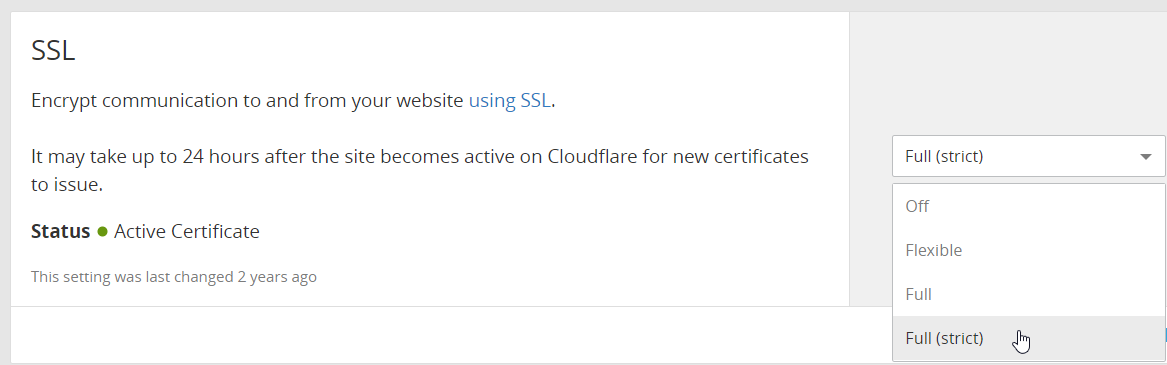
Another change you should definitely make is using HTTPs only for the connection between your server and CloudFlare. Make sure you use Full (strict) mode under the Crypto > SSL section in the CloudFlare dashboard. If you didn’t already know, you can get a SSL certificate for free and automate renewal easily using Let’s Encrypt. So there is no real reason to not make this change.
DNS Record
DNS Records can leak the origin IP if the origin IP appears in any records. In my case, I had a A record called server pointing to the origin IP which had to be changed.
Mail Server
Hosting mail services on the same box as your web server is another problem. Mail servers will not trust mail that fails to pass certain anti-spam checks. Emails that are missing various headers like X-Originating-IP will likely not be trusted. Servers that don’t have the correct mail DNS records pointing to the origin server will not be trusted. Servers that fail a reverse DNS lookup will not be trusted. Typically a mail server will lookup the name of your mail server mail.example.com, retrieve its IP and compare it to the connection IP, then perform a reverse DNS lookup on that IP (using the PTR record) and ensure it points to the mail server name.
One solution here is to not run a mail server.
Another is to send your emails knowing they will be untrusted by mail servers (meaning they will always be sent to the spam folder or might not reach their destination at all).
However, if you need proper trusted mail services you must use an external mail service. Unfortunately, almost every external mail provider will include your origin servers IP address in the X-Originating-IP header field to deter people from using their services to deliver spam. This means an attacker simply needs to get your web server to send an email (via the external mail provider) to retrieve the origin IP by inspecting the RAW email message.

After some research, I discovered that Amazon Simple Email Service (or Amazon SES) did not include the X-Originating-IP header field in outgoing mail. However, to ensure email services were not being used for spam, Amazon required you to verify your domain. Furthermore, Amazon monitor your bounce back rate and your complaint rate. If either metric creeps too high then your account status may be in jeopardy which may lead to service termination.
Outbound Requests
A very common issue is that may websites make outgoing requests to user provided endpoints. Making a request to a server you deem safe is fine (i.e. trusted APIs, another server you own) but user input SHOULD NEVER BE TRUSTED! In my case, users on my website could create an account and upload an avatar. Alternatively, they could enter the URL of an image on the web and my web server would fetch the image, store in locally and then use it as that users avatars. The problem here is that its not CloudFlare making the outgoing request, its your origin server. Therefore, an attacker could set up their own web server, enter a link to an image they are hosting, then look at their web server logs to see which IP just accessed their image. That IP is your origin server IP and is now leaked!
The simplest solution here was to not provide the alternative method.
Leaking Client IPs
One additional consideration to make is protecting the IP of your users. If users on your website can make posts and share content that is retrieved separately by the client over HTTP rather than sent by the origin server in the RAW HTML (i.e. images specified in an <img> tag), then they can steal the IP of any user that views that content. A user will load a page with the content on it, they will receive the RAW HTML payload from CloudFlare, next their browser will fetch any external references (i.e. to images in <img> tags) using the clients connection, thus leaking the clients IP to the external server hosting the content.
One solution to this is to use an image proxy which routes all images through your web server.
I ended up using camo as my image proxy which is open source and very easy to set up.
With an image proxy, all links to images are replaced with link that looks like this:
|
1 |
https://www.example.com/image-proxy/109c028c973810545a43bf0f4b8d6f1b114a82f8/68747470733a2f2f692e696d6775722e636f6d2f637a79536938312e736e67 |
The image URL is then decoded (using a shared secret key) to retrieve the original external image which is then provided to the client via the origin server.
This protects the clients IP but we’ve just leaked the origins server IP.
To solve this, you will need to use a whitelist of trusted external websites that can be used to source images.
For example, you may only allow images be posted from imgur.com.
This may be a slight inconvenience to users but it protects both their IP and the servers origin IP.
Software Vulnerabilities
This is one is pretty obvious but stay up to date with security patches for any software you use and for the box itself.
Changing your Origin IP One Final Time
After making all the above changes, it will likely be necessary to change your origin IP by requesting a new IP from your server provider. This is because there are many websites out there that store historical DNS record information. Some in particular target CloudFlare protected websites. This change is especially required if you were already being attacked as the attackers will already have the servers origin IP and thus your new leakage prevention solution won’t matter.
Keep in mind that clever attacks may still find your new origin server IP using your old origin server IP. If your webserver displays your website when accessed directly by IP, an attacker could assume a newly allocated IP might be on the same /24 or /16 subnet. It would take no time at all to write a web scraper in Python to iterate over all IP’s in that range to search for a server that is responding to HTTP/HTTPS requests and has your logo (or any other identifying information) in the HTML source code. One way to help stop this is by disabling direct IP access to your website or by displaying a simple forbidden page for all direct IP accesses.
Impact
After making all of the above changed, I noticed a massive improvement. Prior to making the changes I received one medium size attack every 3 months. These attacks would take down my website and leave it down for the majority of the day until the attack stopped. After making these changes, I have received almost no significant attacks over the past 3 years. I did receive 1 very large attack that caused some disturbance but the web server still remained online throughout the attack. The best part is I’m only paying $20 for my server a month which is amazing given its overall traffic and the frequency of attacks. On the other hand, a proper DDoS mitigation solution with failover servers would cost hundreds a month and is only really viable for business solutions rather than side projects.
Overall, I’m very happy with the results.