RSS
 

Archive for the ‘Programming’ Category

Creating Chessort: The Chess Puzzle Sorting Game

03 Aug 2024

Introduction

I’ve recently been enjoying playing chess, especially chess puzzles. During some of my games and puzzles, I often found the top move but failed to gauge the strength of the second-best and third-best moves. So, I searched for a game that would allow me to sort moves based on their strength but couldn’t find anything. That’s when I decided to create such a game myself.

Planning

The idea is simple. Given a chess position and a certain number of legal moves, sort them from strongest to weakest and then check to see if you are correct. For this idea, we’d need data that provides a board position (by its FEN) and also some legal moves you can sort. A backend server to serve this data to us from a database. A frontend to display the app and allow us to play.

Data Preparation

It would be difficult and time-consuming for us to manually create positions and legal moves for us to play. Even randomising this is a poor choice. Instead, we are privileged to use the Lichess.org Open Database. The puzzle database provides us with 4,062,423 interesting positions that have been pre-generated! Furthermore, we get some useful metrics such as Rating Deviation, Popularity, and Number of times Played. We can use these metrics to further filter down the results into picking tried and tested top-notch positions.

The decision was made to use 4 moves in the game as an interesting number of moves to sort as 2-3 is not challenging or interesting and 5 is a little too many. We also needed to have at least 4 legal moves per position for us to be able to create a game. However, if we had more legal moves we could make more games since we could pick any 4 distinct moves from our move set. We decided we wanted the top 50 moves for any given position. We don’t really care about the worst moves beyond 50+ as they’re not really interesting for us to sort.

The implication of these decisions means that for any single position, we would have an enormous number of games we could generate. Using the combination formula, we could generate distinct sorting games from a single puzzle! This means that we would not have to process all that many puzzles from the Lichess open database to have a huge pool of games ourselves. Now of course, not every game is interesting. Sorting the 33rd, 34th, 37th, and 42nd moves is a bit random, not fun and pointless, so we would rely on a good game generation strategy (more on this later).

The puzzle data also did not include anything except the top best move sequence for each puzzle. This meant that we would have to generate this ourselves. We decided to use Stockfish, a strong open-source chess engine, for the simple reason that it combines my two greatest loves (stocks and fish). Stockfish would help us analyse each position we had and generate up to 50 top legal moves for it and their engine evaluation (how strong the move is if played).

Stockfish is wildly configurable. Tweaking its parameters could result in different output for legal moves. We would pre-generate the data for our game as real-time generation is much too slow. One consideration made is we may want to regenerate the data at a future time to tweak parameters. We wanted to do this in a controllable way so it would be easy to overwrite rows in our database, etc. Our approach was to transform our input Lichess data into Chessort chunked data. Each chunk represents a certain number of processed lines from the Lichess input CSV data. We decided to use chunk sizes of 1000. This way, regardless of the number of filtered lines and parameters, each chunk always represented the same number of input lines.

This is what the metadata for an example chunk looks like:

Notes:

  • We use an evaluation depth of 25 for an adequately accurate result suitable for analysis games. Anything in the range of 20-25 is suitable here.
  • Each 1000-sized chunk takes roughly 70 minutes to produce on my machine (running 24 threads, 64GB RAM on a Ryzen 3900X).
  • SHA256 hashes are stored as metadata to ensure reproducibility.
  • 90+ popularity, 100+ games played, and a max rating deviation of 100 were found to produce super interesting games.

Database

Our database is a simple MariaDB cluster that I already run to power various projects. We use an ingestion script to process our Chessort CSV data and ingest it into the database.

The only thing of note here is we convert the relative engine evaluations into global evaluations during the ingestion process. For example, if our input CSV had #1 as the evaluation and it was Black’s turn to play, we’d store this as #-1 instead. So each evaluation metric represents the global evaluation in our database.

Backend (Server)

Flask was used to power the backend server. The server is responsible for generating games, serving them, and validating solutions.

Two interesting problems arose in this space:

  • Game generation.
  • Difficulty estimation for humans.

Game Generation

Generating games is a key part of the project. Let’s say we have 1 position and 50 moves. If we simply picked any 4 distinct moves, this could create a boring game. Boring games are those where all the moves are extremely terrible since it is not useful in chess to analyse only simply awful moves. In chess, the goal is to constantly find the best move. Example evaluations: -1234, -1322, -1832, -2011.

There are also extremely difficult games which are impossible for humans to solve. Consider these evaluations: +2, +1, -2, -4. Not even the best chess players would be able to tell apart these four moves that are all extremely neutral in strength.

Therefore, to create a fun game, we need a nice variance between the moves selected. We should pick some strong moves and also some weaker ones. Some moves that are good for the turn player, and some that are bad, etc. Of course, we can tweak the selection parameters to generate games of varying difficulty.

We could make this extremely easy game: #1, +500, -500, -1 where most players should find both mates and then be able to sort the remaining 2 moves based on which is better for the turn player.

To tackle game generation, we create a generic interface MoveSelectionStrategy which looks like this:

Now we can create many different strategies which accept a set of moves and produce the number of required moves as output. Each strategy has a can_handle method to determine if it will be able to produce a valid output and a select_moves method to produce the output.

The strategies can also make use of a helper SmartBucket class which sorts each move into distinct buckets based on its evaluations. This is useful because it’s often undesirable to pick 2 moves of equal strength as they are correct in multiple positions when sorting. However, we are free to do this if we intentionally want to create easier games.

As of writing, there are two strategies being used:

  • Top Spread Strategy: Picks the top move and then the next 3 top move with a minimum normalised evaluation strength spread allied.
  • Random Generation Strategy: Used as a fallback in case all other strategies fail (this strategy is guaranteed to pass).

Difficulty Estimation for Humans

Another interesting problem is assigning a difficulty to a game. Given a position and a set of moves, how can you gauge how difficult it will be for a human to sort these moves?

Naturally, we assume humans are able to sort things when there is a clear difference between them. In chess, humans should be able to tell apart a mate in 1 (#1) from a mate in 2 (#-2) but maybe not +450 from +420. Therefore, the variance between evaluation strengths is the determining factor.

In general, this is how difficult it is to compare different types of moves for a human, from easiest to hardest:

  • Mate and centipawn (e.g., #1 and +200)
  • Mate and another mate (same side) (e.g., #1 and #4)
  • Centipawn and another centipawn (e.g., +400, +50)

After some collaboration and guidance from various members of the Lichess and Stockfish developer communities on Discord, I was able to formulate a solution. Please note this solution is a work in progress and by no means perfect (it will iterate over time).

Solution Overview

The solution involves mapping mate values to a [0, 0.5] range. We do this by passing the mate value (like 1, 2, 3, etc.) into a sigmoid function. A sigmoid function takes its input from [∞, -∞] and normalises it into a [1, 0] range. The function is exponential in nature, so values in the middle (0.5) are more varied compared to values at each boundary (1 and 0). Once we have the mate values in a [0, 0.5] range for both white and black, we offset these values so that white mate values fall into a [1.5, 0.5] range and black values fall into a [0, -0.5] range.

For centipawn values, we also pass them through a sigmoid function. This maps all centipawn values (positive or negative) into a [1, 0] range.

  • Mate moves get exponentially closer the further they are from mate in 1 (#1).
  • Centipawn moves get exponentially closer the further they are from neutral (0).

We put these lists together so that mates for white come first, then centipawn values, and finally mates for black. This list is then normalised using linear scaling into a [1, 0] range. This gives us a normalised strength mapping for each move.

Difficulty Comparison

To compare how difficult it is for a human to sort these values, we find the adjacent differences (diffs) between each value. The larger the adjacent diff, the easier it is to sort (because the strengths are further apart). There is a special case for adjacent diff values of 0. A value of 0 indicates the same exact strength and is excluded (because in our game, if two moves are the same strength, we accept any ordering, which makes the game significantly easier).

Finally, we take the adjacent diffs and compute their harmonic mean. We use a harmonic mean here (over a regular mean) so that smaller values greatly influence the final difficulty. This is because even if one pair of move comparisons is hard and the rest are easy, the overall difficulty is still hard (to sort all adjacent pairs).

Final Difficulty Mapping

If we then take this result and put it into a [0, 100] range, we get a numerical value that represents difficulty.

It’s important to note:

  • A centipawn to centipawn comparison will be bound to a [50, 100] output.
  • A centipawn to mate comparison will be bound to a [25, 100] output.
  • A mate to mate (same side) comparison will be bound to a [75, 100] output.
  • A #1 and -#1 comparison produces the smallest output of 0.

Therefore, we need to group the final difficulty number into exponential bounds like so:

This mapping helps classify the difficulty level of the game for human players, ensuring a balanced and engaging experience.

Frontend (App)

Finally, we need an juicy frontend to play the game. After some deep thought, I came up with the following brilliant mock-up:

Chessort Paint Mockup

As we all know, Paint is the industry leader for design mock-ups. We also know my design skills are unparalleled, which led to this beautiful masterpiece. Look at the subtle chessboard colouring, the tasteful misalignment of the cards. Oh my god, it even has red arrows.

Anyway, our design is simple: a responsive two-column design for the game with the chessboard on the left and a panel on the right. The panel would contain the cards to sort, and you would use drag and drop to sort the cards. Once you submit your answer, the cards would then reveal which ones are correct and which are incorrect. We’d then also display some prominent information like the engine evaluation strength and the engine’s overall rank for that move. That’s it!

Our choice for the frontend framework was React + Vite + SWC + TypeScript. Our goal was a lightweight and fast website because it didn’t really need much to work. Although, as a perfectionist, I did spend a lot of time polishing various aspects of the website.

We made some useful design and feature changes:

  • Combine submit/next buttons into a single one.
  • Add an action bar for useful actions.
  • Add keyboard support for accessibility.
  • Add move previews (selecting a card previews the move on the chessboard).
  • Add hit counters (how often a game and how often a position was played).
  • Support full responsiveness (for every viewport dimension imaginable).
  • Support WebKit (yes, this has its own category, how special!).

Working on the frontend was relatively straightforward with the exception of supporting WebKit. I spent an insane amount of time debugging an SVG render bug for WebKit that caused my chess piece SVGs to turn black during some rerenders. You can see the reproduction in this PoC Codesandbox. This turned out to be an old bug present in WebKit, which was on the only iOS device I had to test with (my iPad). Updating my iPad to the latest iOS version resolved the issue. An important takeaway here is to always update your test devices!

Final Thoughts

Chessort Game Screenshot
Thank you for following along with the creation of Chessort! I hope you found the process as intriguing as I did. Now, it’s time for you to experience the game yourself. Head over to Chessort and start sorting those moves!

Additionally, if you’re interested in the code behind Chessort, you can check out the open-source project on GitHub. Chessort is licensed under the GPL, and contributions are always welcome.

Happy sorting!

 
No Comments

Posted in Programming


Optimising Move Sprint in Jira: A Case of Innovation

30 Nov 2023

Onslaught of clicks to move a single sprint

My engineering team conducts sprint planning sessions fortnightly. We create a new sprint in Jira ahead of time and refine our list of issues we want to tackle for the upcoming sprint during sprint planning. New sprints are always created at the bottom of the backlog in Jira. We like to keep our upcoming sprints together at the top of our backlog because we have several other long-living sprints that should remain at the bottom of the backlog.

One issue the team quickly became frustrated with is that we only have a move sprint up and move sprint down action for moving sprints. This means that in our backlog of typically ~10 sprints our scrum master would have to click the move sprint up action 10 times to reach the top of the backlog.
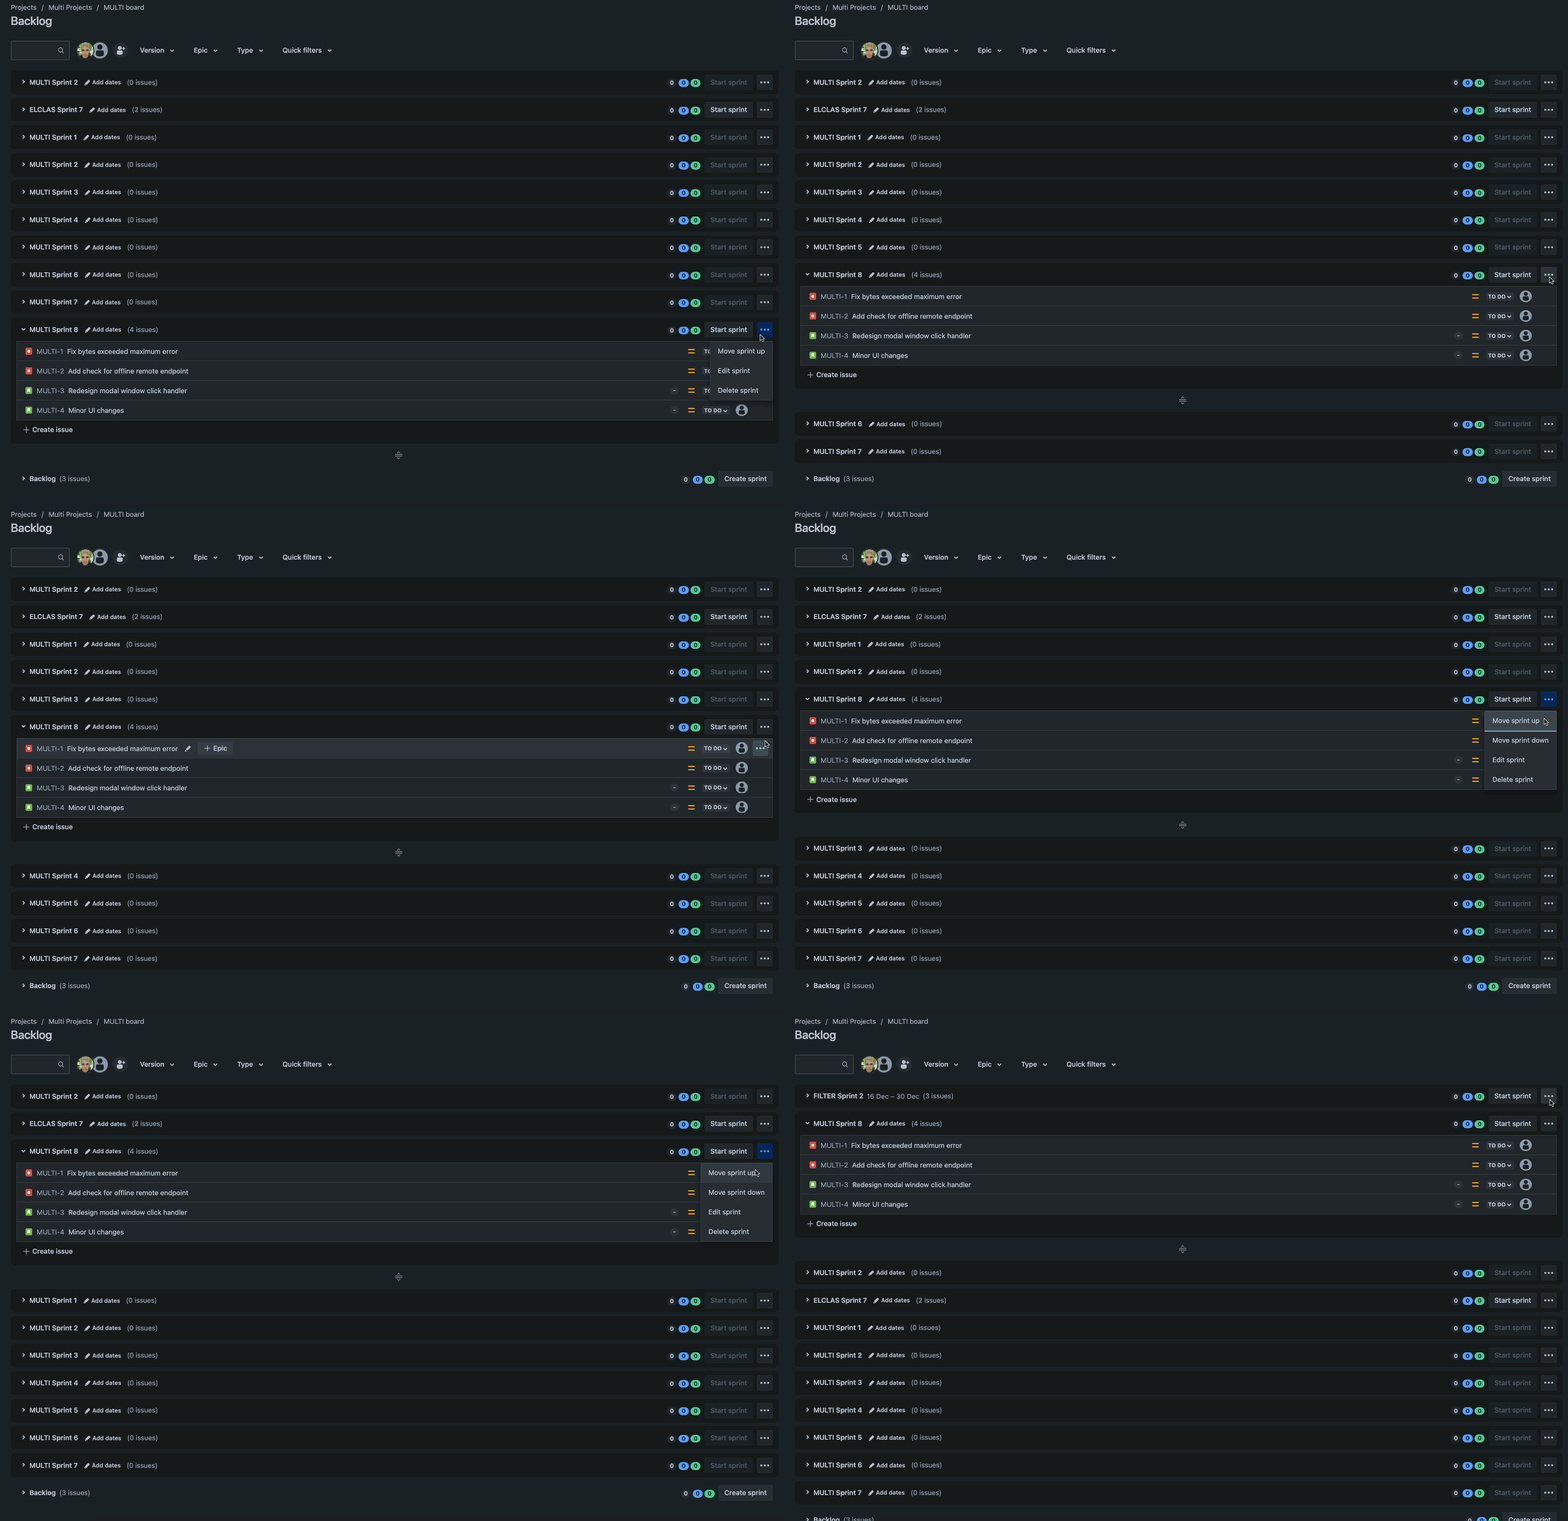
Move Sprint up using Old Jira Swap Endpoint

An onslaught of clicks just to get a single sprint to the top of the backlog! 😢

This displeasure quickly grew to become a common annoyance in our team. Many other Atlassian customers had also faced this issue and have made a feature request (JSWCLOUD-21509) asking us to add functionality to solve this problem.

Sprint sequences in Jira

Let’s understand how sprints are ordered in Jira. The sprints table in Jira has a SEQUENCE field which has a BIGINT PostgreSQL numeric data type. This field controls how sprints should be ordered relative to each other. A lower SEQUENCE number means a sprint should appear higher up on the backlog compared to a higher SEQUENCE number. In other words, sprints in your Jira backlog are ordered by their SEQUENCE value in ascending order.

When a new sprint is created, the SEQUENCE field is null for that sprint. The SEQUENCE will only be set to a non-null value if that sprint’s ordering is changed (i.e. the sprint is moved up by the user). If a sprint has a null SEQUENCE in the database, we fall back to using its Sprint Id (a unique numeric identifier for sprints that will always be present) as its sequence instead. The effective sequence of a sprint is its sequence value (if not-null) or the Sprint Id otherwise as a fallback.

The backlog view groups sprints into three main sections. Active sprints are pinned to the top of the backlog. Future sprints sit directly below the active sprints. The backlog, a single special sprint that cannot be deleted or moved, is pinned at the very bottom of the backlog view. Each sections sprints are ordered amongst themselves by the effective sequence value (from lowest effective sequence at the very top to highest effective sequence at the very bottom).
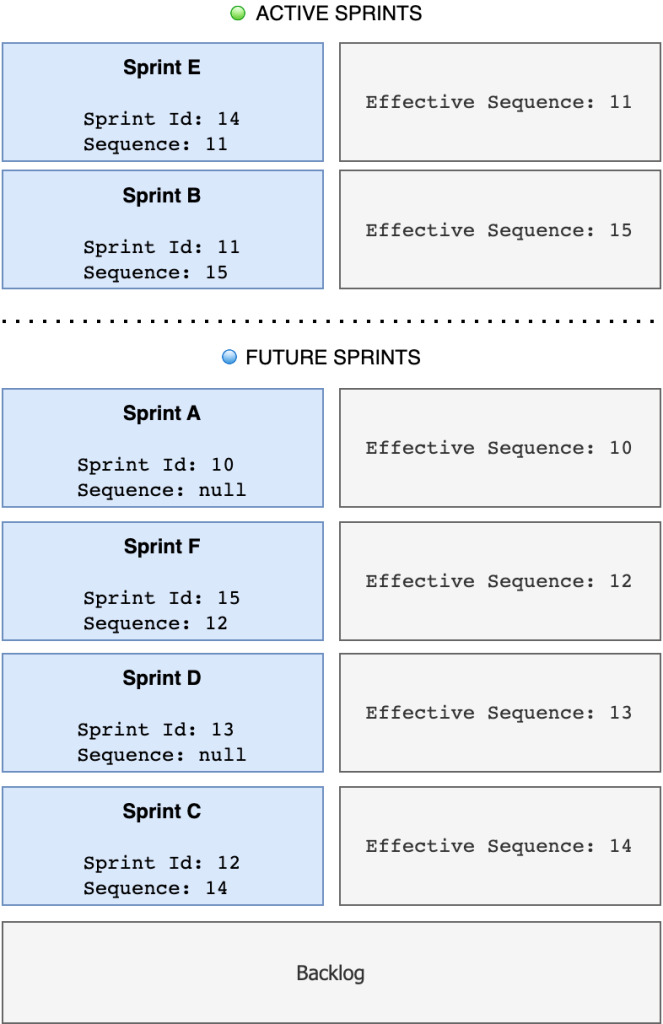
Jira Backlog Sprint View with Sequences

Backlog Sprints ordered by their effective sequence

Innovation time: Assessing the existing swap API

Atlassian is proud of its 20% time initiative in which every team member is given to opportunity to improve our software in the way that they feel is most important to them.

A few of my Atlassian colleagues and I rallied together to tackle the above problem. We wanted to add a move sprint to top and move sprint to bottom feature to complement the existing sprint actions.

Our original assumption was that implementing such a feature would be as trivial as replacing the parameters we pass in to an existing move sprint function. However, this assumption was wrong.

Jira has a Greenhopper REST API (which originates from the acquisition of the Greenhopper plugin from Green Pepper Software in 2009). This API supports a sprint swap endpoint which looks like this:

This endpoint accepts a source {sprintId} and the target {targetSprintId} and swaps the positions of only those two sprints without modifying any other sprints in between them. Therefore, we cannot use it to solve the problem at hand because we want to move a sprint to the top (and preserve ordering for all other sprints in between) and not simply swap a sprint with the top sprint.

Implementing the new move sprint API

The next task was to implement a move sprint endpoint to satisfy our requirements.

Initially, we attempted to complete a move operation using the existing backend powering the /swap endpoint. This is possible because we can achieve a move by completing multiple swaps instead. This can be thought of as a modified bubble sort where we are bubbling the source sprint to its target sprint destination one swap at a time. However, this approach was not feasible due to limitations in performance (more on this later).

Therefore, we decided to create a new move sprint endpoint that looks like this:

I’ll omit notes on the technical implementation of this endpoint as this task was mostly straight forward and unremarkable.

Handling cross-project boards

Multiple boards & cross-project boards

In Jira Software, a project can be thought of as a container used to organise and track tasks, or issues, across the entire team. A board visualises and manages a subset of issues in the project. A sprint contains a more deeply refined subset of issues from the project.

There are a few configurations we must support when considering Company Managed Projects (CMP) in Jira.

A project can have multiple boards. Each board is powered by its own JQL filter which controls which issues are filtered from all issues to be included in the board. In other words, the JQL filter determines which issues you will see when you look at that boards board view or backlog view. A board belongs to only one project.

The JQL filter powering a board can include multiple projects. This is known as a cross-project board. This means that the board’s views may include issues from many different projects.

A board can have one or more sprints. Each sprint originates from one board. A sprint can have many issues but an issue belongs to only one sprint. Each issue originates from a project as denoted by its issue key. However, an issue can be moved between different sprints.

When observing the CMP backlog view, you will see all sprints that:

  • contain issues that match the boards JQL filter, and
  • were originally created on the board we are viewing (issues in the sprint are still hidden if they do not match the boards JQL filter even if the sprint itself is visible).

This behaviour ensures all the needed important entities are visible based on your boards JQL filter.

Speed vs. correctness

Unfortunately, this complicates our moving logic because we now have to ensure such backlogs not only support move operations but do not break relative ordering of sprints on other backlogs.

Lets consider an example with four projects who each have one board. In our setup, Project A contains a single board Board A. Project B contains a single board Board B and so on.

Board A has a JQL filter that looks like this:

As explained previously, this board will now include all issues that belong to the above four projects. It will also include sprints that contain any matching issues from those projects.

Board A currently has no future sprints but all of the other boards have some future sprints. There are a total of 7 future sprints visible. All are freshly created and have a null sequence value.

Observe Boards A’s backlog view:
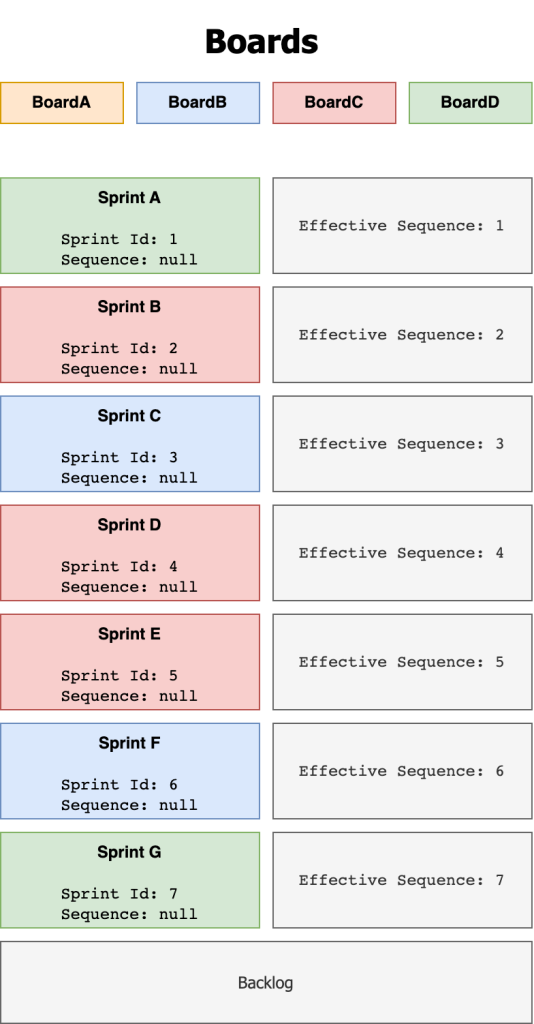
Cross Project Board Example
Note that the background colour of each sprint above corresponds to the board it was created from.

When implementing our move algorithm, our initial instinct was to only process sprints that belonged to the same board because boards most commonly only have a single project included in their JQL. However, this would not support cross-project boards. In fact, it breaks relative sprint ordering. Let’s explore why.

Consider I want to move Sprint E to Sprint B’s position. Both sprints belong to Board C. We will only process sprints that belong to Board C for this move.

This move can be visualised as:
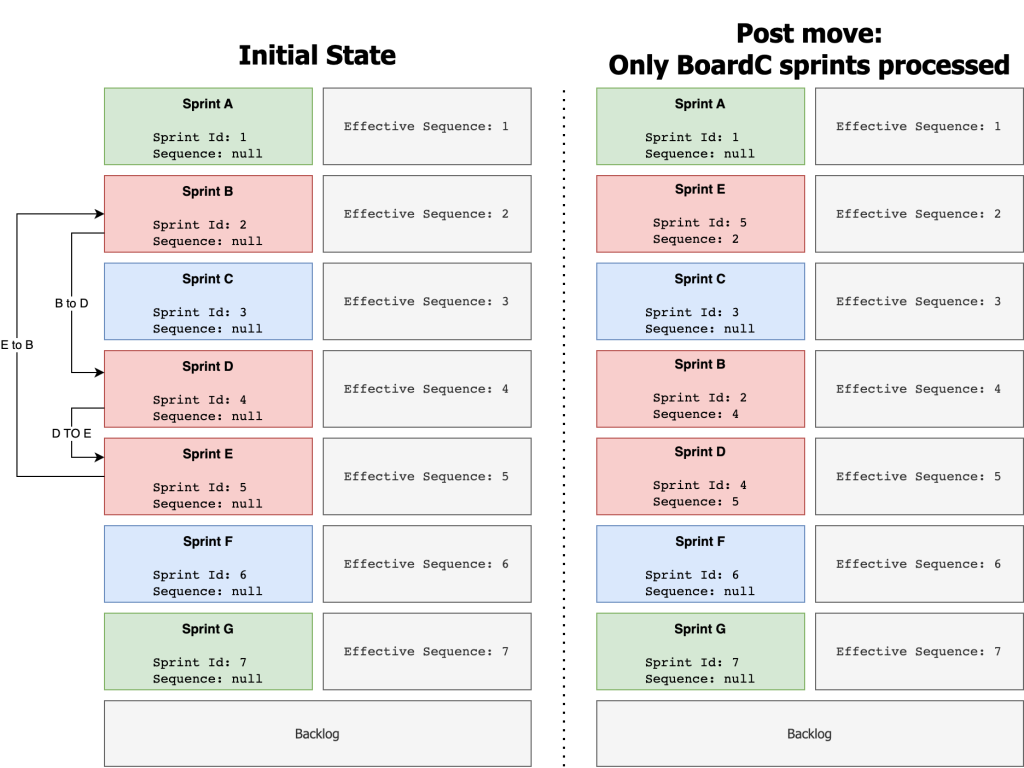
Cross Project Board Move Sprint

We set Sprint E’s sequence to the sequence of Sprint B. Then we set Sprint B’s sequence to the sequence of sprint D. Finally, we set Sprint D’s sequence to the original sequence of Sprint E.

If you only consider the sprints from Board C, the post move ordering is correct. Sprint E is at the top, followed by Sprint B then Sprint D. This ordering would also appear correct if you were to look at Board C’s backlog with a default board JQL (as it would only show the 3 sprints from Board C).

However, looking at Board A’s backlog as visualised above we can see the post move ordering is incorrect. Sprint B is incorrectly below Sprint C, but it was previously above it. Relative ordering was not preserved between these sprints as a result of the move.

If we instead decided to process all sprints with a sequence between our source and target sprint, we would preserve relative ordering.

This move can be visualised as:
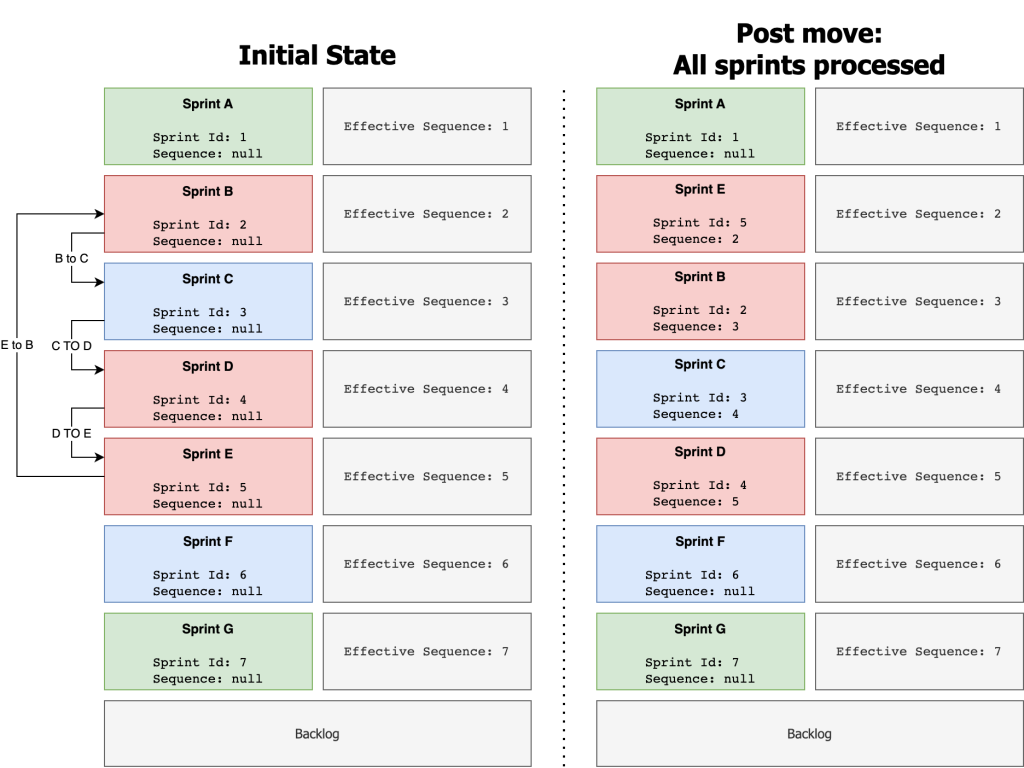
Cross Project Board Move Sprint with Correct Relative Ordering

Notice how Sprint B remains above Sprint C just as it was previously. Relative ordering was preserved and this is outcome is more correct.

Therefore, to support cross-project boards, we must always process all sprints that have an effective sequence value between the source sprint and target sprint.

It is important to note that there is a trade-off here. Processing all sequences is strictly correct, preserves all sequence ordering globally and offers a great customer experience for those using cross-project boards. However, it is computationally slower. Processing only sprints in the current board we are looking at is faster but will break relative ordering for cross-project boards.

In the end we decided to process all sequences as full correctness and a great customer experience was desired and the measured performance was still very good.

Optimising for maximum performance

The new move implementation yields serious performance gains. It can process 10000 sprints in the same time as the old implementation handled 5 sprints. That is a ~200,000% performance gain!!

Performance here is measured by comparing the total request time taken to achieve a desired move via multiple /swap operation (old implementation) and via a single /move operation (new implementation).

For example, in a backlog of 5 sprints to move a sprint from the very bottom to the very top would require us to process 5 sprints. Using the old /swap implementation, this would take N-1 swaps where N is the number of sprints needed to process. This is because we would have to swap the source sprint with the sprint directly above it 4 times until it reached the very top. This results in us performing 8 total sprint updates (4 swaps x 2 sprints updates in each swap). Keep in mind there is some additional overhead in the Jira Monolith when calling the /swap function repeatedly due to additional lookups and validation. On the other hand, the new /move implementation only performs 5 total sprint updates in a single go. For 5 sprints, the old implementation takes 2.35 s (P50) whereas the new implementation takes 317 ms (P50).

Furthermore, we utilises a more efficient algorithm which yields performance improvements for even a single operation that only processes 2 sprints. One of the ways we achieved this is by taking advantage of Sprint caches in Jira Monolith to speed up our sprint fetching. Jira operates on sprints often and typically has a cache of all sprints ready at any given time.

Recall that we need to fetch all sprints between a sequence range to perform our sprint updates. We can do this by querying the database directly with a custom query or by fetching all sprints from the sprint cache and then filtering the sprints in memory using our sequence range criteria. Opting to use the cache is much faster and also reduces database load which is a benefit to the rest of the application. It is also best practice as this cache is designed to be used for heavy sprint operations in Jira.

This provides us with great performance improvements when processing 2 sprints. The old implementation takes 717 ms (P50) whereas the new implementation takes 300 ms (P50).

Another limitation with the old implementation is that requests to Jira monolith will time out after 60 seconds. Therefore, the operation would fail even if we ignore the poor performance when processing a large number of sprints.

You can explore the full performance comparisons in the table below:

Number of Sprints Processed /swap (Old Implementation)Request Time (P50) /move (New Implementation)Request Time (P50)
2 717 ms 300 ms
5 2.35 s 317 ms
10 3.78 s 322 ms
20 6.04 s 327 ms
50 13.85 s 339 ms
100 25.62 s 352 ms
200 53.80 s 371 ms
500 Too slow! Request timeout after 60s! 410 ms
1000 Too slow! Request timeout after 60s! 650 ms
2000 Too slow! Request timeout after 60s! 876 ms
5000 Too slow! Request timeout after 60s! 1.56 s
10000 Too slow! Request timeout after 60s! 2.34 s
20000 Too slow! Request timeout after 60s! 8.59 s
50000 Too slow! Request timeout after 60s! 10.46 s
100000 Too slow! Request timeout after 60s! 25.50 s

It is important to note that most move operations will not touch many sprints at all. Even our oldest and largest customers have at most 150k sprints on their Jira tenant. The vast majority of these sprints will be closed sprints. Our metrics show us that overwhelming majority of move operations will process 1000 sprints at most.

Duplicate Sequences Bug

During early stages of testing we soon encountered what would be the most interesting problem to solve as parting of delivering this feature.

In the database, SEQUENCE is a standalone numeric field and is not a relational field. This means its possible to have two sprints with the same effective sequence. The problem here is that we cannot have deterministic ordering if any two sprints have duplicate sequences. This leads to a backlog sprint order which is undefined and hints at data inconsistency issues.

Consider this scenario where sprintId 2 and sprintId 3 have the same sequence.

sprintId SEQUENCE
1 null
2 2
3 2
4 null

Or this scenario where sprintId 1 and sprintId 3 have the same sequence. Recall that sprintId 1 has an effective sequence of 1 due the fallback logic which sets its sequence to its sprintId if SEQUENCE is null.

sprintId SEQUENCE
1 null
2 2
3 1
4 4

Customers had reported issues with duplicate sequences in this ticket: JSWCLOUD-21024

The only code that mutated the SEQUENCE field in Jira was the swap sprints endpoint. Recall that this is an endpoint that has existed in Jira for many, many years. It was therefore logical to investigate this code for any bugs that could lead to the database storing duplicate sequences.

Lets take a closer look for the code responsible for handling the database updates of sprints:

In this method we accept two sprints sprintA and sprintB alongside their current sequence values via sequenceA and sequenceB. We build a sprintsToUpdate list which includes two sprints to update. We set sprintA's sequence to sequenceB and sprintB's sequence to sequenceA. This effectively completes a swap in ordering.

In the main loop, we iterate over all sprints that we need to update and make a call to updateSprint(). This call will either succeed or fail. If it fails, outcome.isInvalid() will be false and we will return an error. Otherwise, if there are no errors we will return ok() after exiting the loop.

I have omitted the code for updateSprint(), it utilises a Sprint DAO object to write the changes for a single sprint to the database. It is heavily tested and appears to be very reliable. However, it can occasionally fail or time out in rare cases when there is contestation on the table as a whole or when row-level locks are present which prevent writing to specific rows.

The issue here is a race condition which can lead to the first update succeeding but the second updating failing. For example, consider two customers Alice and Bob. Alice is attempting to perform the operation swap(sprintA, sprintB). At the same time Bob is performing a long running sprint operation on sprintB which has triggered a row-level lock on sprintB in the sprints table.

We follow through the code for Alice’s request and see that we can successfully call updateSprint() for sprintA with no issues in the first loop iteration. We have persisted sprintA in the database with a sequence of sequenceB. In the second loop iteration, our call to updateSprint() fails as sprintB is currently row-locked by the long running sprint operation Bob has triggered. This call immediately fails and we exit the method and show an error message to Alice. However, we never update sprintB’s sequence to sequenceA. Therefore both sprintA and sprintB now currently have a sequence that equals sequenceB which is a duplicate sequence that has been persisted in the database.

Our solution here is to introduce a database transaction to ensure all or nothing updates for the entire batch of sprints. This is best practice and enforced all across Jira but was missed in this specific instance. The transaction ensures any failure in persistence of data leaves the existing data in a consistent state.

The rare occurrence of this bug led to a delay in its patch. It is very uncommon for two customers to initiate sprint swap requests with overlapping sprints at the same time. This is why there have only been a handful of occurrences of this bug over the past 10 years. Based on customer reports, it would appear as if this bug mostly affect large enterprises with a lot of users working in the same projects (and hence more likely to update the same sprints at the same time).

The introduction of a transaction fixed new instances of the duplicate sequence bug from occurring. However, there were still thousands of tenants out there with bad data in their database as a result of the bug occurring previously before the patch. Affected customers would receive an error when attempting to swap or move sprints that had duplicate sequences. Customers would then need to contact the Atlassian support team who would then take backups of their table and manually patch their database using a patch script.

Ultimately, this is a huge pain point for our customers and requires manual effort and takes up their valuable time. We were highly motivated to improve this situation for both customers and the Atlassian support team (to reduce their workload).

The innovation team put their heads together to find a solution. Initially, we considered using a once-off database upgrade task to patch the issue across all tenants which is best practice for most use cases. In our case however, it was not immediately clear if there were other problematic code paths in Jira monolith that could result in the duplicate sequence bug. For example, the bug could resurface due to a server to cloud migration flow or other code that is operating on sprints but is lacking a transaction. This would potentially require us to create multiple upgrade task to address the problem which was not desirable.

We finally decided to implement an asynchronous global tenant patch. Whenever we detect a duplicate sequence in the database, we would fail that immediate request and trigger a patch operation in the background. Failing the immediate request is a sub-optimal user experience but was accepted as a trade-off given the rarity of its occurrence. Also blocking the request on a synchronous patch would be undesirable as it would be a poorer experience overall. We utilise a queuing system for such background takes in Jira and the speed at which our background task is processed can be variable. However, our metrics show it typically is completed within a few seconds.

The background patch operation would asynchronously go through the database and reset all sprints with duplicate sequences to null. As this is a global patch we expect it to run once per tenant. After a single patch, the data should be in a consistent state and all future move operations should succeed without encountering the duplicate sequence issue. We expect to eventually deprecate and retire this patching code once we have confirmed all code paths that operate on sprints are robust and consistent.

It is interesting to note that this patch is a recursive operation as setting a sprints sequence to null could in turn spawn new duplicate sequences.

Consider the following case:

sprintId SEQUENCE
1 null
2 2
3 2
4 3

After setting the sequence of sprintId 2 and sprintId 3 to null, we introduce a new duplicate sequence between sprintId 3 and sprintId4 which both now have an effective sequence of 3:

sprintId SEQUENCE
1 null
2 null
3 null
4 3

Therefore, we must also reset sprintId 4’s sequence to null.
The implementation of this patch is huge win for saving our customers and the Atlassian support team valuable time!

Delivering a collection of improvements to customers

The innovation team was accomplished in delivering a collection of improvements to customers.

We have implemented a new, performant, flexible move sprint API. We have fixed a long standing data inconsistency issue in Jira and implemented an automated patch for a previous manual and tedious operation for both customers and the Atlassian support team.

There is now also a lower barrier to entry for teams at Atlassian to build other features like drag & drop sprints on the backlog.

At Atlassian, many small and big features get shipped not as planned roadmap projects but through innovation time which is available to all team members. Different team members come together combining their unique perspectives and skillsets to solve real problems just like this one for our customers.

In the end, our innovation team is happy to be saving customers a lot of clicks going forward!
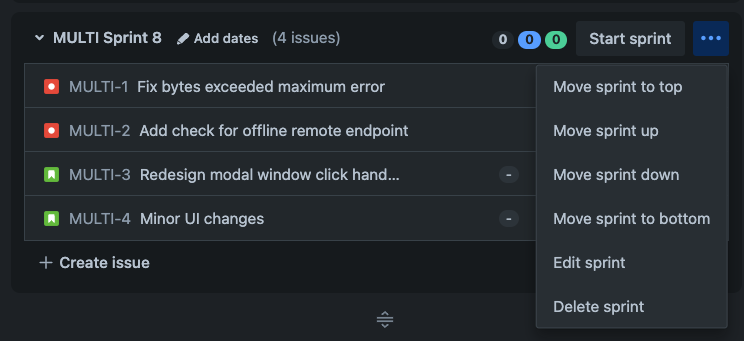
Jira Backlog New Move Sprint

 
4 Comments

Posted in Programming


Disable Slack @channel and @here notification for all channels

01 Sep 2020

Problem

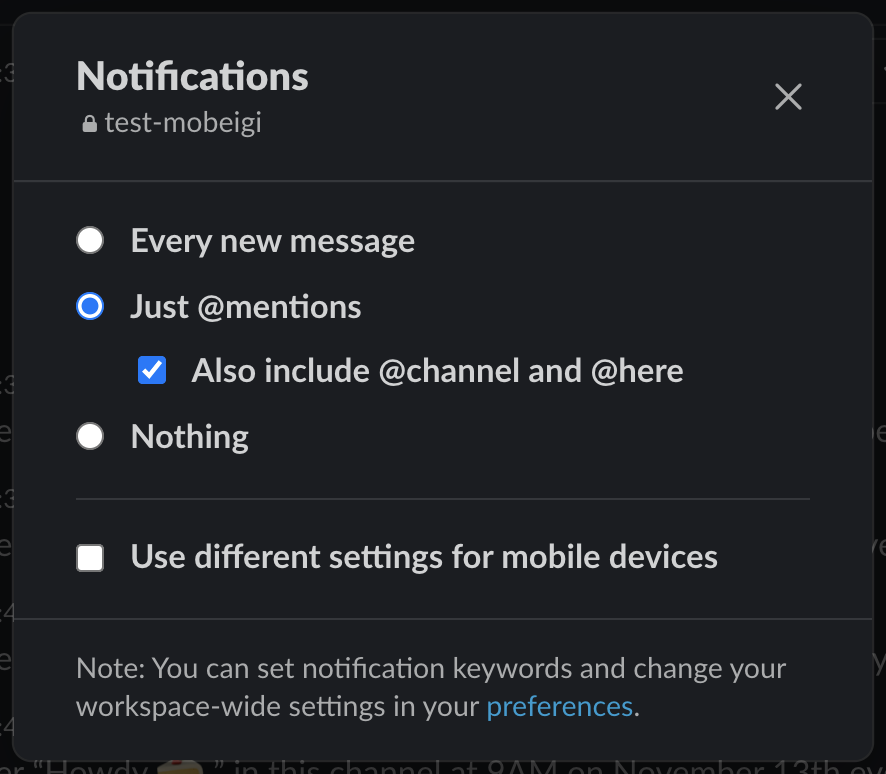
Slack can get very noisy if you are part of a big organisation. Slack offers various notification controls on a per-channel basis.

You can choose to be notified if:

  • There is a new message
  • Somebody mentions you
    • Somebody mentions @channel or @here
  • Never

For example:

Slack Notification Options for a Channel

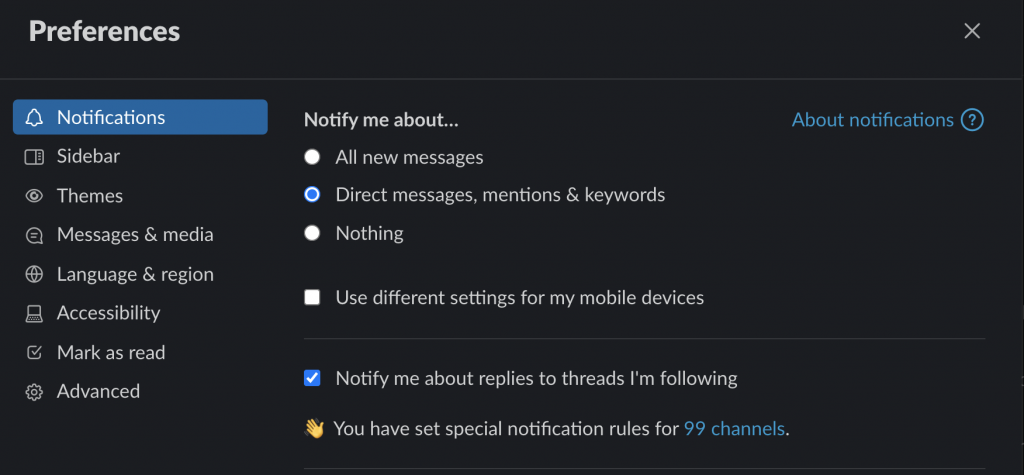
Slack points out that you can tweak your workspace-wide settings in your preferences. However, these settings do not mimic the per-channel options. They are missing the ability to suppress @channel or @here mentions. This is the main annoyance with Slack notifications! Getting a ping for a channel you are in that has nothing to do with you. My org actually discourages using these mentions in some channels but somebody eventually does (an easy mistake to make) which immediately summons a hoard of angry emoji reactors who have lost their state of focus.

Slack Workspace Wide Notification Preferences

Slack pls help?

Contacting Slack support did not help in this case. This feature was not planned on their roadmap for the foreseeable future. The only options were to manually update every single channel or turn off all notifications.

Script Solution!

Luckily, we can write a script to solve this problem for us!
It works by fetching a list of all Slack channel ids from the api/client.boot endpoint and then calling the api/users.prefs.setNotifications endpoint to update the preferences for each channel. A delay is used between each update to prevent server-side rate limiting.

First, download the latest version of the script from here:
https://gist.github.com/mobeigi/8e5372f1e14e2a302e186d1753f9a649

Or copy and paste it from here:

Steps

  1. Visit the React web app which powers the React native Slack client at:
    http://app.slack.com/client
  2. Sign in and switch to the workspace of interest and wait for the page to fully load.
  3. Open your browsers developer console
  4. Execute the following line:

    It should output an object with a bunch of team ids. Copy and paste the id of the workspace of interest.
    In my example its: EXAMPLE17
  5. Replace the slackTeamId in the Javascript script with your id from Step 4.
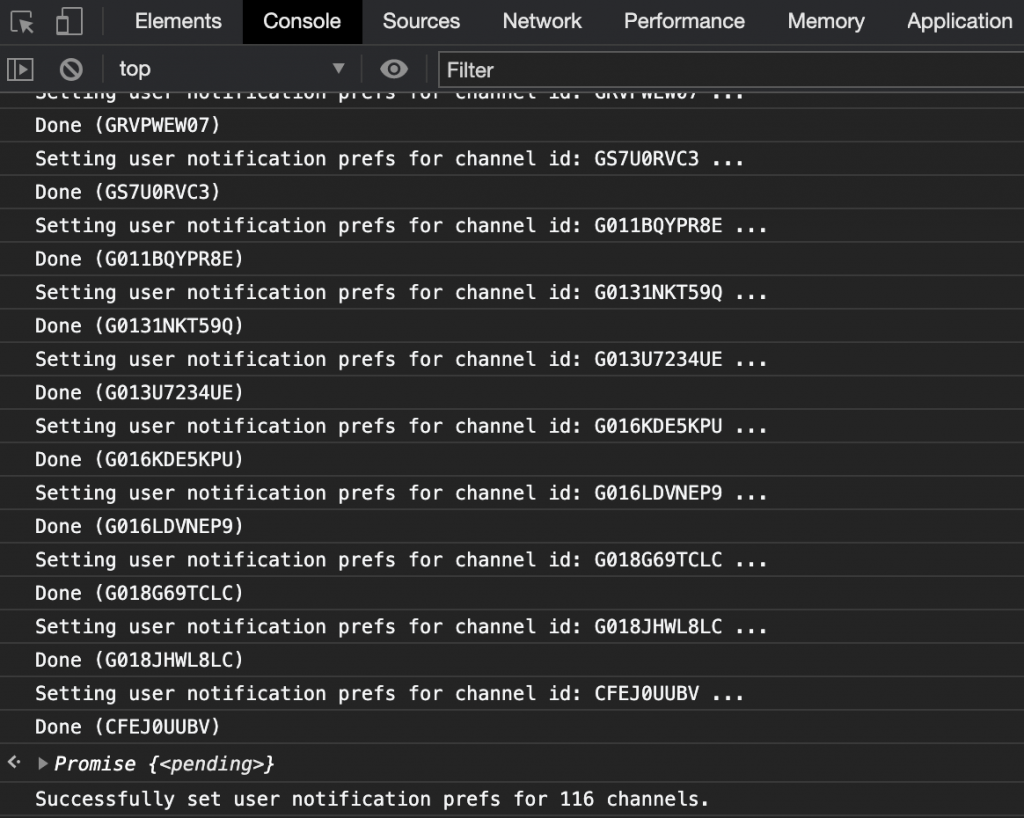
  6. Copy and paste the edited Javascript script into the developer console and execute it.
    The script may take a few minutes to run depending on the number of channels you have joined.slack_user_noti_pref_bulk_update.js script execution
 
6 Comments

Posted in Programming


Git Commit Message Hook for JIRA Issue Keys

08 Jul 2020

Overview

Credits to this StackOverflow answer: https://stackoverflow.com/a/53669975/1800854

Follow these steps to set up a global commit message hook that will extract the issue key from your branch id and prepend it to your commit messages automatically. This allows other team members to easily track down who wrote what code.

Steps

    1. Make sure you have a variant of grep installed that supports PCRE
      • On Mac you can do this using: brew install ggrep
    2. Create folder somewhere on disk for global git hooks

    3. Make a file here called commit-msg  with the following content. File is also available here.
      NOTE: Replace grep with ggrep if needed (for Mac)

    4. Make this file executable

    5. Configure git to globally use this folder as the global hook folder

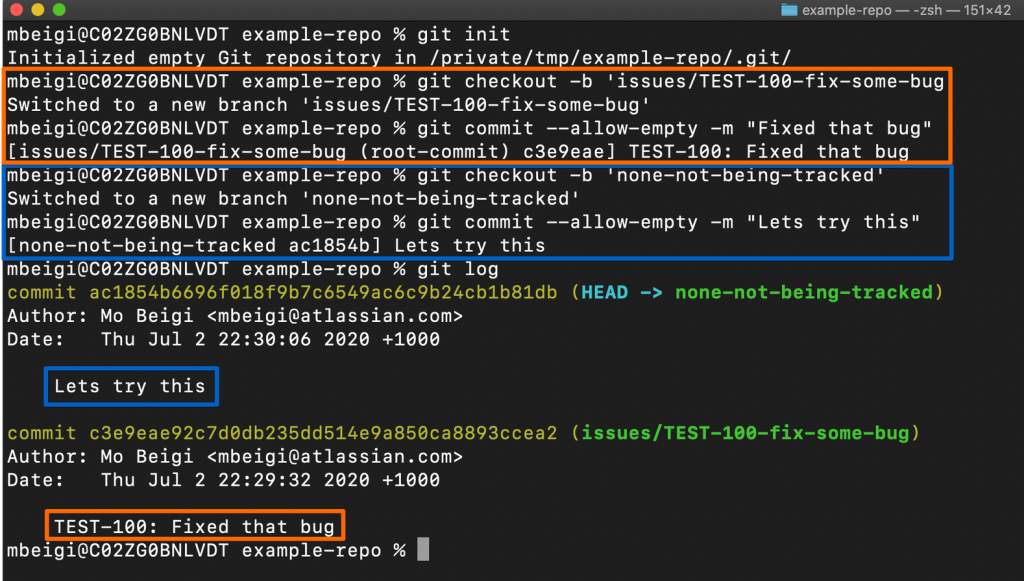
Example
Jira Issue Git Commit Prehook Example

Notes

The regexp used will match:

  • ✔️ TASK-100
  • ✔️ JAVA-1-is-the-best
  • ✔️ ROBOT-777-LETS-get-it-done-2
  • ✔️ issues/EASY-42-its-too-easy-baby

Works but be careful with:

  • ⚠️ DEJAVU-1-DEJAVU-2-maybe-dont-do-this

Will not match:

  • test-500-lowercase-wont-work
  • TEST100-nope-not-like-this

Warning: Global hooks will override local repository hooks if the projects you are using utilises them.

 
4 Comments

Posted in Programming


Restoring Facebook’s Birthday Calendar Export Feature (fb2cal)

31 Jul 2019

Context

Around 20 June 2019, Facebook removed their Facebook Birthday ics export option.
This change was unannounced and no reason was ever released.

As a heavy user of this feature I was very upset. I use the birthday export feature to be reminded of upcoming birthdays so I can congratulations friends and family. After it became clear that is was not a mistake I decided to write my own scraping tool to restore this functionality for personal use.

This posts includes some of my findings on how I did this.

Where can I find the tool?

If you are simply after the tool, I’ve opensourced it on Github:
https://github.com/mobeigi/fb2cal

Initial Research

I was sure a scraping solution would work as Facebook still displayed all your friends Birthdays at the /events/birthdays page which is located here
https://facebook.com/events/birthdays/ .

Facebook Birthday Events Page

The friend ‘bubbles’ are grouped by the birthday month. Upon hovering over a user a tooltip with the format Friend Name (DD/MM) is shown which reveals the friends birthday day and month which is all the data we need for our calendar.

Facebook Birthday Hover Tooltip

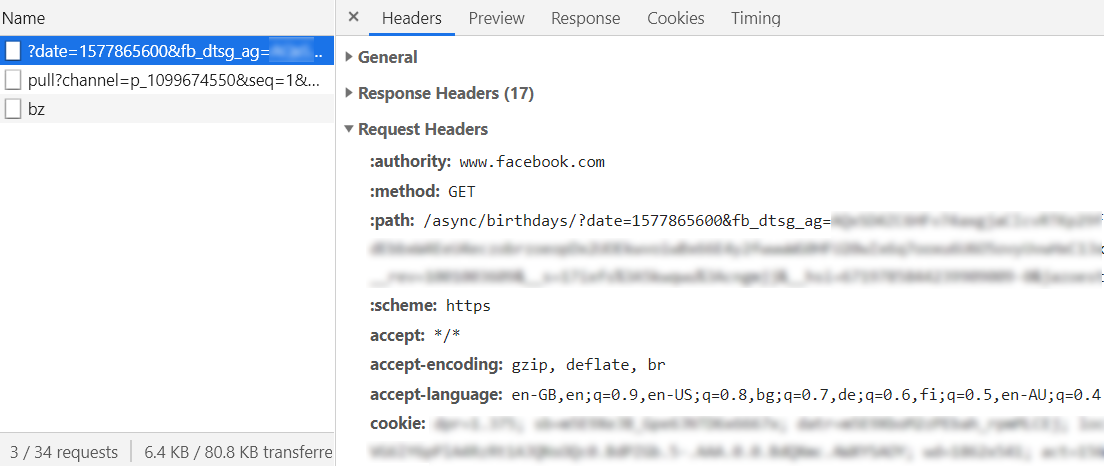
Scrolling down on the page would dynamically load in more birthday month groups which means AJAX endpoints were being called. Using Chrome Developer Tools I can easily monitor outgoing XHR network requests as I scroll down and trigger the AJAX calls I’d like to replicate.

Chrome Dev Tools XHR Monitor

Querying the Birthday Monthly Card AJAX Endpoint

The Birthday Monthly Card AJAX endpoint we found is responsible for returning the HTML that powers the monthly grouped bubbles pictured above.
We end up with this GET AJAX query (some query parameters have been redacted/snipped):

After some trial and error we notice that the endpoint still returns a valid response as long as we include the following three query parameters: date , fb_dtsg_ag and __a.
Required parameter explanations:

  • The  date parameter is an epoch timestamp. The month that the epoch lands in is the month that will be used for the response. So we can pass in any epoch within a particular month to get a response for that month.
  • The  fb_dtsg_ag parameter is an async token (CSRF protection token). This token seems to have a lifetime of 24 hours and can be reused between subsequent AJAX requests. It is stored in the source code of the same  /events/birthdays page so we can scrape it from there and pass it alongside our AJAX requests.
    "async_get_token":"AQxSD4ZC6HFv74axgbaCIcvRTKp29fSPxI3puZLEFiGfAQ:AQx1pSd8-cFSM6eRRV-VOQ4z_Bc9Hjp_dMYAuRIbhz9sgg"},3515]
  • The __a parameter seems to be a generic action parameter and must be set to 1.

The response from the endpoint looks a little like this:

Facebook likes to prefix all AJAX responses with for(;;);  as a security measure to prevent JSON hijacking. We can strip this away from the response. The rest of the response is a valid JSON object which we can parse.
We have a lot of useful information in this payload including:

  • Friends Full Name (in the  alt and  data-tooltip-content  fields)
  • Friends Birthday month/day (in the data-tooltip-content  field)
  • Link to friends Facebook profile page revealing their vanity_name or profile_id (in the href  field)
  • Link to Facebook profile display picture (in the img  src  field)

We will need all of this information to generate our calendar .ics file except for the Facebook profile display picture.

Parsing the data-tooltip-content

The data-tooltip-content is in the following format (for myself using Facebook locale en_UK ):

There are various problems here! The format is based on the current Facebook users locale.
In other words, the format will change based on the Facebook users selected language.
The date format as well as the ordering of Name/Date can change.

The solution here was to query another AJAX endpoint ( https://www.facebook.com/ajax/settings/language/account.php ) to retrieve the users locale. Each locale was then mapped to a date format. Finally, we strip away the users name, brackets, right-to-left mark, left-to-right mark and various other unicode characters leaving only the birthday day and birthday month with some separator character in between. It then becomes easy to parse the date using the locale to date format mapping.

Another issue was that Facebook would replace the date with a day name if the Birthday for the friend occurred in the next 7 days relative to the current date (and not the passed in epoch timestamp). So for example if today is the 01/01 and a friends birthday was the next day and that day was a Tuesday, the tooltip content would show  John Smith (Tuesday) . This logic was easy enough to add once the issue was discovered.

Getting the Facebook entity id

Our calendar .ics file will need a UID (unique identifier) for each friends Birthday event. Otherwise, every time the .ics file is imported into a calendar, duplicate events will be created which is not what we want as we would like to automate the updating process. The obvious candidate for a unique identifier is a Facebook users entity id which is unique per Facebook user, page etc. Vanity names are also unique on Facebook but we decided to not use them as they can change unlike entity ids. Unfortunately, our payload from the Birthday Monthly Card AJAX endpoint does not contain the entity id for every friend. Instead we get a URL to their profile page.

If a friend does not have a vanity name (custom profile page url) setup then we can simply extract the entity id from the id field:

Otherwise, the problem becomes much more difficult as I did not easily find an endpoint which takes in a vanity name and returns a unique identifier.
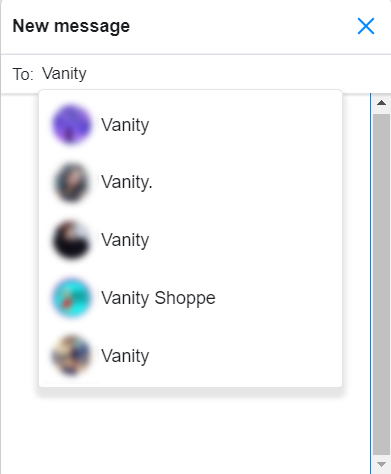
The best solution that was discovered was querying the COMPOSER QUERY endpoint ( https://www.facebook.com/ajax/mercury/composer_query.php and passing in the following query parameters: value , fb_dtsg_ag and __a. The  value parameters is your search query which in our case is the vanity name.

This endpoint is naturally used on Facebook when you are searching for a person to message.

Facebook Composer Endpoint Example Query

This is a typical response for the search term Vanity:

Note that the search results can return multiple matching entity results including users, pages, apps etc. However, we are guaranteed that our Facebook friend/user with the matching vanity name will appear in the list somewhere. All we have to do here is compare our vanity_name from before with the alias field in the composer query response payload. The matching entry is thus our Facebook friend and we can take the corresponding UID directly off the JSON object.

A consequence of this approach is that we now must perform 1 lookup per Facebook friend to get their entity id. This slows down the script significantly. However, no better solution was found. Third party websites such as findmyfbid.com scrape the users profile page directly to retrieve the entity id from the source code but this approach was profiled as being slower (including via mobile version of Facebook).

Rate limiting note: If the composer query endpoint is hit enough in a short period of times, it seems to somehow restrict the number of entries returned. It seems to limit the query results to only returning results matching friends names, page names exactly. This limitation then disappears over time. So one should be careful how often or quickly they hit this endpoint!

Generating our Calendar ICS File

At this stage, we simply query the Birthday Monthly Card AJAX endpoint passing in epoch timestamps belonging to the first day of every month for a full year (12 months total) and storing the results. We should have all the required fields needed for each friend (Birthday day, Birthday month, Name and UID) so we can generate our Calendar ICS file. This file can then be automatically pushed to the cloud or stored on the local file system for importing into third party applications like Google Calendar.

Final Remarks

This was a fun little project to undertake and a minimum viable product was produced in only a few hours which was nice. It is important to note that these methods do bypass the Facebook API entirely and as a result are against the Facebook TOS. However, as somebody who really wants to tell their friends HAPPY BIRTHDAY! and desperately needs reminders, it was a sin that had to be committed.

Happy Birthday with Cupcakes

 
15 Comments

Posted in Programming


Discord Discriminator Farming

30 Apr 2018

This post outlines how I got the Discord discriminator that I wanted.

This process is old and is no longer required as Discord now allow you to change your discriminator via Discord Nitro.

What are discriminators?

Discord is a free modern voice and text chat application. Discord uses usernames to identify its users. However, instead of a username becoming unavailable after just 1 person uses it, Discord allows 9999 people to share the same username. It does this by using the combination of a name (unicode string) and a discriminator (4 digits) as a Discord tag.  SomeUserName#1234 is an example of a Discord tag. This is a great idea (and more services should use it) as it allows many extra people to use their first name or a common alias as their username.

Each Discord account still has an underlying Discord user ID (i.e. 356005924638224307 ) that can is echo’d if you type in  \@SomeUserName#1234 into any text channel. This is typically hidden from most users and used by developers when making plugins and bots.

Why do discriminators matter?

They don’t but just like usernames, discriminators are visible and thus can be considered to be a cosmetic name tag attached to your account. This is why people want specific Discord discriminators. Because it looks nice! User#0001  or User#1337  look a lot nicer than User#6519. For a long time, Discord has been strictly against scripts/bots which were designed to change a users Discriminator. This is because they believed the aesthetics of discriminators did not matter and their only purpose was to allow more people to share the same usernames. This statement was somewhat unfair given that almost all Discord devs had manually changed their discriminators!

Writing a Discord Discriminator Farmer

Back in mid 2017, I decided I wanted a new fancy Discord discriminator to replace my randomly generated one of 8471.

There is only one way to change your discriminator. Discord offer a name change feature in which you can change your username but not your discriminator. However, what happens if the username you want is already taken by someone with the same discriminator as you? Two users can’t have the same Discord tag. In this case, Discord changes your username (assuming all 9999 discriminator for that username aren’t taken) and then randomly generates a new discriminator for you!

This is the key behaviour that I used to write some python scripts to farm Discord discriminators.

Step 1: Gathering a list of usernames and discriminators

The first step in the process was to write a script ( get_discrim.py) to store a large number of Discord usernames and discriminators belonging to existing users. Recall that we needed to change our username to a new username that already had a user with our current discriminator. For example, if our Discord username was  SomeUserName#6513 and a user existed called  Tony#6513, we could change our username to Tony and because  Tony#6513 already exists, Discord would generate a new random Discriminator for us.

Overall, this script was fairly simple to make. We simply made a new Discord account and joined a lot of guilds (aka servers) with very high member counts. We then uses the Discord API to return a list of all members in the guild that were currently online. By joining a few massive guilds like /r/Overwatch and /r/PUBATTLEGROUNDS, we had access to over 60000+ Discord tags which meant we had an existing username for 99% of discriminators. Our script stored the results as a dict which was dumped as a pickle so our second script could use it. This file was regenerated every 15 minutes to ensure we wouldn’t get stuck (in the rare case where our dump contained no matching usernames for a particular discriminator).

Step 2: Farming them Discriminators

The second script ( farm_web.py) would authenticate with Discord, load in our pickle from our first script and begin changing usernames. However, there was a problem. Discord initially allowed you to change your username as many times as you wanted. Then they restricted username changes to once per hour. Then once per two hours. Then once per day which is what the “secret” time window was when I was testing. This was to combat people doing exactly what I did. Now, given that I wanted a very small subset of target discriminators (22 total) out of a possible 9999, this would not do. As there was no way to get around this username change time limit I was forced to use multiple accounts and change each of their usernames daily.

This worked well initially before I ran into another issue. IP rate limiting. Discord would rate limit my servers IP address causing a lot of the username change API requests to fail. I overcame this quite easily by spanning out my name changes throughout the day rather than making them all at once.

Another issue was the fact that each account needed an Authorization Token to authenticate with the API. I ended up manually fetching and storing the authorization tokens for all the accounts I used by logging into each account, filling in a captcha if one was presented and then retrieving the authorization token from the browsers local storage. As long as you did not log out, the authorization token remained valid indefinitely (this is why you can stay signed into the same Discord account forever on the same machine/browser).

Finally I was able to run my script successfully with about ~150 accounts at once. Meaning I had 150 new discriminators generated over a 24 hour period. Again, this isn’t a huge amount but it was enough to make bruteforcing feasible.

Discord Account List

Once a name changed resulted in a new random discriminator that was in my target list, that thread would end and an entry would be written to my log file to alert me.

Step 3: One final name change

Over 2 weeks later running my scripts 24/7, I finally had 1 alert letting me know that a target discriminator was found. I really liked the result so I decided I would keep it and turn off my scripts. However, the account with the final discriminator did not have the username I wanted.

The final step involved changing the username to the username that I wanted to use. This part is important, you had to ensure the username you were changing your name to DID NOT have a discriminator that matched your new discriminator. Otherwise, Discord would just give you a randomly generated discriminator. This was easy enough, all you had to do was try to add a user via the friend system and see if the friend request was send successfully indicating the account existed or not indicating the account did not exist and it was safe to proceed. For example, if my final account with my target discriminator was  RandomUserName#1337  and I wanted my tag to be  MyName#1337, I would send a friend request to  MyName#1337 to see if that tag existed. If it did not, I could proceed and get it for myself! Otherwise, you would unfortunately be out of luck.

Changes to Date

After I stopped running my scripts, Discord eventually increased the username change time window and enforced harsher IP rate limiting. Finally, they allowed users to change their discriminator via Discord Nitro although most of the good ones are probably taken by now.

Source Code

The source code for this project is available here:
https://github.com/mobeigi/Discord-Farmer

 
8 Comments

Posted in Programming


Making my First libGDX Game

15 Apr 2018

Recently I decided to create a simple Android game and it was much easier than I thought it would be!
I had never made an Android game before but I had made a few Android apps as well as a JOGL game which is great as it meant I had a good idea of what was happening behind the scenes.

Game development frameworks like libGDX often make it easy to create games because they handle a lot of the low level work. libGDX is more or less a wrapper over OpenGL and allows you to make raw OpenGL API calls if you so desire. Even though libGDX is very simple to use, I would still recommend making a simple game with raw OpenGL to fully grasp what is happening behind the scenes.

Picking a game to make

The first step in making a game is deciding what you actually want to make. For my first game I thought I’d stick to something simple that other developers had made tutorials on. Turns out that Flappy Bird clones are the Hello World App’s of the game development world. As I own a green cheek conure called Siavash it was only reasonable I made a clone called Flappy Siavash.

Brent Aureli’s Tutorial

I’m not going to go through the actual game making process in this post.
I ended up following this tutorial by Brent Aureli up to around part 7 before I got a hang of things and started to finish off the game myself.

Features

My game ended up having the following features:

  • Main Menu Screen (very basic with a play button)
  • Custom sprite (coloured to match my bird Siavash)
  • Obstacle crash animation (rotating into nose dive into ground)
  • Obstacle crash screen flash
  • Using cages as the obstacle
  • Number of cages active at any given time can be changed
  • Fade in/Fade out for various text/sprites/etc
  • Pause menu to pause game
  • Game over menu with option to play again
  • High score functionality (using local storage)
  • Works and tested on Android, Java, Web
  • Uses custom distance field font with fragment/vertex shader
  • Scrolling backgrounds
  • Randomised obstacles
  • Endless mode

Gameplay

Flappy Siavash Gameplay

Tips

Here are some tips which may help you when creating your own libGDX game:

  • Make sure you dispose resources (textures etc) when you are done using them or you will have memory leaks.
  • Don’t remake the same Texture etc all the time, store the Texture somewhere (in the class or put in in an asset manager and retrieve it whenever needed)
  • If possible, keep assets with widths/heights that are powers of 2. Assets seem to fail to load correctly with GWT (Google Web Toolkit) otherwise.
  • Organise assets in subfolders (shaders/images/sounds/sprites)! Don’t dump everything into the same folder.
  • When updating your states, always use dt (delta time) to scale your changes appropriately.
  • Place sprites in your word using coords relative to the cameras viewport width/height.
  • Keep a helper class with various static methods useful for performing common tasks (do the same with a debug class for debugging).

Source Code

The code from my project is available on Github if you are interested:
https://github.com/mobeigi/Flappy-Siavash

Play Online

Play Online At:
https://mobeigi.com/blog/projects/flappysiavash/

Play Store App

I decided to release this app to the Google Play Store to learn about the Play Store publishing process.

Available at:
https://play.google.com/store/apps/details?id=com.mobeigi.flappysiavash

My Next Project

I am now working on a much more complicated/unique game which I plan to polish up.
This project will likely take much, much longer but I will also learn a lot along the way.

 
No Comments

Posted in Programming


Run Adobe Audition in the Background to Reduce your Microphone’s Background Noise

08 Apr 2017

Recently I have been looking for a way to reduce the background noise my microphone produces. I own a Blue Yeti Microphone mounted on a RODE Arm Stand and I like to keep my microphone fairly far away so its not in my face and doesn’t distract me while I record audio or play video games.

However, at this distance, the microphone unfortunately picks up a lot of background noise including computer fans, outside noises and even small things like picking up/putting down a cup of water.

Part of the Solution

To solve this I found a wonderful video by SaaiTV linked below. I have built onto this solution to make it better but the first thing you should do is follow the Youtube video tutorial and come back here to continue. Keep in mind I am using Adobe Audition CS6 and would recommend you use the same version (it will help later on in this tutorial).

The Problem

If you followed the instructions in the video and are happy with the result, you may want to keep the noise reduction effect so its always on. For recording audio and small tasks, you can simply run Adobe Audition and open your saved session and then close it when you are done. If this is all you want to do then this post won’t help you.

However, if you want to keep the noise reduction effect 24/7 so you can take advantage of it all the time, I will tell you how to run Adobe Audition when your computers boots up in the background so its out of the way.

Rest of the Solution

When you run Adobe Audition in the background keep in mind it will always be running. On my machine (which is quite good), it used 150MB of RAM and 1-3% CPU constantly.

Task Manager Adobe Audition CPU/Memory Usage

This is no issue for me at all but might reduce performance significantly on other machines.

Now, the first thing you want to do is download a program called AutoHotKey from https://autohotkey.com/

Once installed, remember the full path to the  AutoHotkey.exe executable. We will need it later.

In my case, the full path is:

Now, pick a folder on your computer to store a new AutoHotKey script file ( .ahk  file).
In this example I’ll pick:

We are going to put a new file here called  adobe_audition_microphone.ahk. Download the file I have prepared and copy and paste it in this folder: Download Link

Now, open this file using Notepad (or your favourite text editor). You should see this text:

There are a few adjustments you need to make.
Firstly, replace ADOBE_AUDITION_PATH with the path to your Adobe Audition executable. Make sure to keep the quotes around the path intact.
Mine was located at:

Next, replace SESX_PROFILE_FILE with the path to your Adobe Audition session file. This is the session file you should have saved when following the video tutorial. You can copy this file to the same folder as the .ahk  file we are modifying right now.

I called my file Microphone_Noise_Reduction.sesx and moved it to:

Finally, you will need to change  #32770 and  audition5  if you are NOT using Adobe Audition CS6. You can find the correct values to use using AutoHotKeys Window Spy tool. I will not cover that in this post but leave a comment below if you have trouble with this.

Your adobe_audition_microphone.ahk  file should now be complete.
This is what mine looks like when completed:

Make sure to save your changes before exiting your text editor.
Now, perform a little test by double clicking your  adobe_audition_microphone.ahk  file.
If everything is working, it should open up Adobe Audition, and then hide the window once its open.
It should not appear in your taskbar as a minimised window.
Make sure you see Adobe Audition running in Task Manager.

Now go to Windows Sound options, go to the Recording tab, right click on your Virtual Audio Cable Line, click properties, go to the Listen tab and press Listen to this device. You should now hear your microphone output as processed by Adobe Audition. If you do not, then you have done something wrong.

Windows Sounds Listen to this Device

The last step is to make our AutoHotKey script ( C:\MyAhkFolder\adobe_audition_microphone.ahk ) start with Windows so your microphone’s input is always being processed and output to your virtual audio cable.
There are plenty of tutorials on how to do this on the internet.

Here is an easy one to follow:
https://www.autohotkey.com/docs/FAQ.htm#Startup

Good luck!

 
13 Comments

Posted in Programming


Simple PHP File Download Script

18 Dec 2015

So I recently added a download.php script to my website so that I could force downloads of files instead of having users access them through an indexed directory or through their browser.

I found various scripts online but none of them were as clean as I’d have liked them to be so I wrote my own simple script after a bit of research.

In my setup, the download.php file sits at the root of my website and the filevault folder sites one level higher on the web server. This setup ensures users cannot hotlink to files or directly access them, the script must be used. A benefit of this is that you can add restrictions like allowing a file to be accessed by people from a particular country or by those who have a certain cookie set. If you do not have access to the directory above your websites root directory then you are forced into putting your filevault at the websites root directory.

This is the simple PHP File download script:

Usage

The following link would force the download of that_file.txt

Demo

You can also download the above script (using the script!):
Download download.php Script

 
8 Comments

Posted in Programming


How to fix your League of Legends Registry Paths (OP.GG fix)

30 Nov 2015

Amumu Sad Mummy

Artist: Awskitee

The issue

If you play League of Legends and use any third party tools (to record replays, enhance gameplay, among other things :p) then you have probably run into programs that ask for the path of your League of Legends directory. Fortunately, some programs can auto detect this using the Windows registry. However, if you have moved your League of Legends folder to another folder, reinstalled/upgraded Windows or used a registry cleaner in the past then its possible that your registry entries are corrupt. This means they either don’t exist or don’t point to the correct path.

This is a common issue for most people who cannot watch OP.GG replays as the OP.GG replay batch files rely on the RADs path to function correctly. You might have run into this error:

KR: LOL 경로를 자동으로 찾을 수 없습니다. 도움말에서 관전하기 문제 해결을 보시면 100% 해결 될 수 있습니다. 100% 해결 될 수 있으니, 채팅방에서 괜히 사서 고생해서 물어보지마세요!!!!!!!
EN: Cannot found LOL directory path for automatic. Please see our spectate help page: http://oce.op.gg/help/observer

OP.GG has a section on their website that can allow you to set the path manually (which will be reflected in downloaded batch files) but this must be done for each region and every now and again which is not ideal. For the OCE server, the instructions are under the League of legend.exe file can not be found header at http://oce.op.gg/help/observer/

A permanent solution

I decided to write a script that can fix this issue for third party applications and web apps.
Simply copy and paste the following code into a text file (.txt) using a text editor of your choice (ie notepad).
Then save the file with a .bat extension (call it anything you like such as fix.bat).
Now simply right click the file and Run as Administrator .

Finally, follow the on screen instructions and choose your system architecture (32 bit/64 bit) and enter the path to your LoL folder. If you do not know your system architecture then run the program twice and use both options.

Download Link:
LoL RADS Registry Fixer.bat

Batch script:

 
105 Comments

Posted in Programming