The issue
If you own a piece of Logitech gaming equipment, chances are you probably play or have played League of Legends. Logitech Gaming Software is a tool provided by Logitech to allow configuring your devices. One popular feature is profiles which people can use to tweak settings on a per-game basis. This allows you to automatically change your DPI as you switch from FPS games to MOBA’s to osu!
Now one issue that many people are experiencing is the fact that the League of Legends executable does not automatically update to the latest game client executable on launch. This is mainly because Riot Games stores their game client executable in a path which includes the build version number of the client.
Example path to the game client executable on my system (for build version 0.0.1.152):
|
1 |
C:\Games\LeagueOfLegends\RADS\solutions\lol_game_client_sln\releases\0.0.1.152\deploy\League of Legends.exe |
As you can imagine, this changes from patch to patch and when it does, Logitech Gaming Software fails to pick up this change (due to an issue with their League of Legends signature).
Solution
There is a relatively easy solution I found which you can apply to fix this issue. As we cannot change the file tree structure that Riot uses, we will simply update the signatures that Logitech Gaming Software uses so they can accurately find and locate the League of Legends game client executable after each patch using a combination of the Windows registry and regular expressions. Note that Logitech could fix this issue themselves by shipping a more robust signature with their tool.
The steps to solve the issue are as follows:
- First, we need to ensure that there is a entry in your Windows registry which points to the League of Legends RADS folder (found inside the directory where League of Legends is installed). You can quickly make sure all entries are correct by following this previous post that I made by clicking here. This is required! (Don’t skip this step).
- Next, close the Logitech Gaming Software by right clicking on its icon in the system tray and selecting the exit option.
- Open your text editor of choice (i.e. Notepad) as an Administrator. You can do this by typing Notepad in the Windows Search Box, right clicking on the Notepad result and selecting the Run as Administrator option. I recommend using Notepad++ as a text editor.
- Now, we want to open a XML file called
GameDatabase.xml which is shipped with Logitech Gaming Software. Press
file and then
open in Notepad and navigate to the folder where you installed Logitech Gaming Software. The file we need is located in the
/Resources/Profile folder.
The file was located here on my system:
1C:\Program Files\Logitech Gaming Software\Resources\Profile\GameDatabase.xmlMake sure you select ‘All Files’ in the open file dialog box so you can see the XML file.
- Now, press
Ctrl + F to search for ‘league of legends’. You should find a block of text that looks very similar to this:
123<profile gkeysdk="0" gpasupported="0" guid="{29A3A279-D451-4667-AACF-2B131358B6E4}" lastplayeddate="" launchable="1" lock="0" name="League of Legends"><description>League of Legends</description><signature executable="League Of Legends\RADS\solutions\lol_game_client_sln\releases\*\deploy\League of Legends.exe" key="HKEY_LOCAL_MACHINE\SOFTWARE\Microsoft\Windows\CurrentVersion\Uninstall\{92606477-9366-4D3B-8AE3-6BE4B29727AB}" name="" value="InstallLocation"/>
This signature is used for the Logitech Gaming Software’s auto game detection feature. First, it looks up the key attribute in the Windows registry with the key name specified (in this case InstallLocation). Then it appends the executable attribute relative path to this value. Note that the relative path already contains an asterisk (*) where the game client build version should be, this is the regular expression matching which is used to match any characters.
The problem is, this registry key did not even exist on my system and won’t exist on yours if you having this issue!
- Now, we want to replace line 3 from step 5 from the
<signature part all the way to the
/> part. Make sure you don’t replace the
<profile or
<description XML elements.
Replace the signature element with the following:
1<signature executable="solutions\lol_game_client_sln\releases\*\deploy\League of Legends.exe" key="HKEY_CURRENT_USER\SOFTWARE\Riot Games\RADS" name="" value="LocalRootFolder" />Now, save the file by pressing Ctrl+S.
This essentially tells Logitech Gaming Software to lookup the registry path that we set in step 1 and use that as the base path. This fixes the signature.
- Finally, start up Logitech Gaming Software again. Navigate to the profile section and jot down (in another Notepad window) all your relevant profile settings so you don’t forget them.
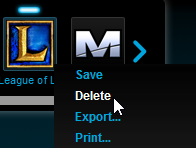
- Now, delete your current League of Legends profile, we don’t want to use old profiles that you may have manually created.
- Next, press the Scan for New Games button.
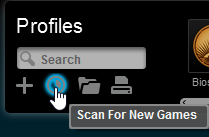
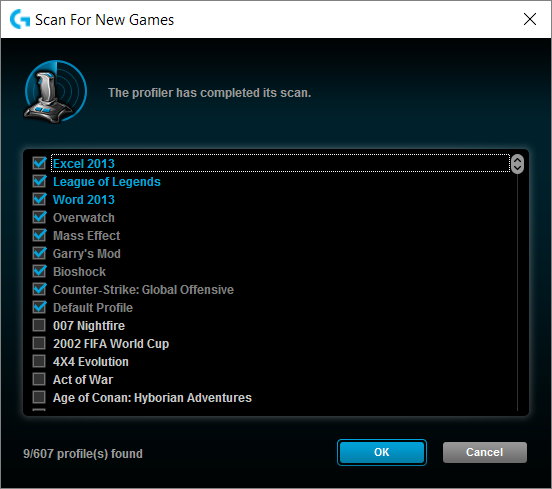
After a short scan, it should detect the League of Legends game executable. The blue coloured text for League of Legends indicates that the fix was successful! Press OK to add the autodetected game profile.
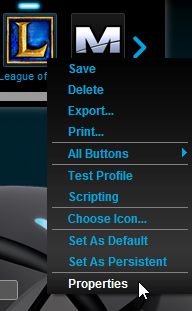
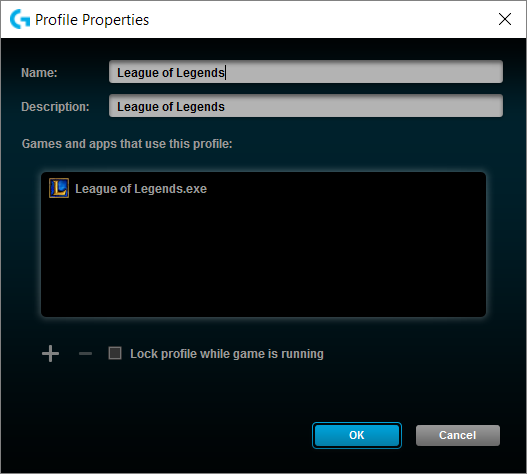
- Verify that the executable was found correctly by checking the properties of the new League of Legends profile. You should see 1 executable called
League of Legends.exe
And that’s it! Now the profile should automatically stay up to date with League of Legends patches. Please note that Logitech Gaming Software updates may overwrite the GameDatabase.xml file as they update/add more signatures. This will break the fix so avoid updating the database. This drawback is still much better than updating the path every time a League of Legends patch occurs which is very frequent in comparison.
