Run Adobe Audition in the Background to Reduce your Microphone's Background Noise
Recently I have been looking for a way to reduce the background noise my microphone produces. I own a Blue Yeti Microphone mounted on a RODE Arm Stand and I like to keep my microphone fairly far away so its not in my face and doesn't distract me while I record audio or play video games.
However, at this distance, the microphone unfortunately picks up a lot of background noise including computer fans, outside noises and even small things like picking up/putting down a cup of water.
Part of the Solution
To solve this I found a wonderful video by SaaiTV linked below. I have built onto this solution to make it better but the first thing you should do is follow the Youtube video tutorial and come back here to continue. Keep in mind I am using Adobe Audition CS6 and would recommend you use the same version (it will help later on in this tutorial).
Unfortunately, the video has since been taken offline.
The Problem
If you followed the instructions in the video and are happy with the result, you may want to keep the noise reduction effect so its always on. For recording audio and small tasks, you can simply run Adobe Audition and open your saved session and then close it when you are done. If this is all you want to do then this post won't help you.
However, if you want to keep the noise reduction effect 24/7 so you can take advantage of it all the time, I will tell you how to run Adobe Audition when your computers boots up in the background so its out of the way.
Rest of the Solution
When you run Adobe Audition in the background keep in mind it will always be running. On my machine (which is quite good), it used 150MB of RAM and 1-3% CPU constantly.

This is no issue for me at all but might reduce performance significantly on other machines.
Now, the first thing you want to do is download a program called AutoHotKey from https://autohotkey.com/
Once installed, remember the full path to the AutoHotkey.exe executable. We will need it later.
In my case, the full path is:
C:\Program Files\AutoHotkey\AutoHotkey.exeNow, pick a folder on your computer to store a new AutoHotKey script file (.ahk file).
In this example I'll pick:
C:\MyAhkFolder\We are going to put a new file here called adobe_audition_microphone.ahk. Download the file I have prepared and copy and paste it in this folder: adobe_audition_microphone.ahk
Now, open this file using Notepad (or your favourite text editor). You should see this text:
; Run Adobe Audition
Run, "ADOBE_AUDITION_PATH" "SESX_PROFILE_FILE"

; Handle the 'adobe audition' didn't close properly diaglog if it comes up
WinWait, ahk_class #32770,,10
ControlSend,, {enter}, ahk_class #32770

; Hide the window once its open
WinWait, ahk_class audition5
WinHide, ahk_class audition5

ExitApp
There are a few adjustments you need to make.
Firstly, replace ADOBE_AUDITION_PATH with the path to your Adobe Audition executable. Make sure to keep the quotes around the path intact.
Mine was located at:
C:\Program Files (x86)\Adobe\Adobe Audition CS6\Adobe Audition CS6.exeNext, replace SESX_PROFILE_FILE with the path to your Adobe Audition session file. This is the session file you should have saved when following the video tutorial. You can copy this file to the same folder as the .ahk file we are modifying right now.
I called my file Microphone_Noise_Reduction.sesx and moved it to:
C:\MyAhkFolder\Microphone_Noise_Reduction.sesxFinally, you will need to change #32770 and audition5 if you are NOT using Adobe Audition CS6. You can find the correct values to use using AutoHotKeys Window Spy tool. I will not cover that in this post but leave a comment below if you have trouble with this.
Your adobe_audition_microphone.ahk file should now be complete.
This is what mine looks like when completed:
; Run Adobe Audition
Run, "C:\Program Files (x86)\Adobe\Adobe Audition CS6\Adobe Audition CS6.exe" "C:\MyAhkFolder\Microphone_Noise_Reduction.sesx"

; Handle the 'adobe audition' didn't close properly diaglog if it comes up
WinWait, ahk_class #32770,,10
ControlSend,, {enter}, ahk_class #32770

; Hide the window once its open
WinWait, ahk_class audition5
WinHide, ahk_class audition5

ExitApp
Make sure to save your changes before exiting your text editor.
Now, perform a little test by double clicking your adobe_audition_microphone.ahk file.
If everything is working, it should open up Adobe Audition, and then hide the window once its open.
It should not appear in your taskbar as a minimised window.
Make sure you see Adobe Audition running in Task Manager.
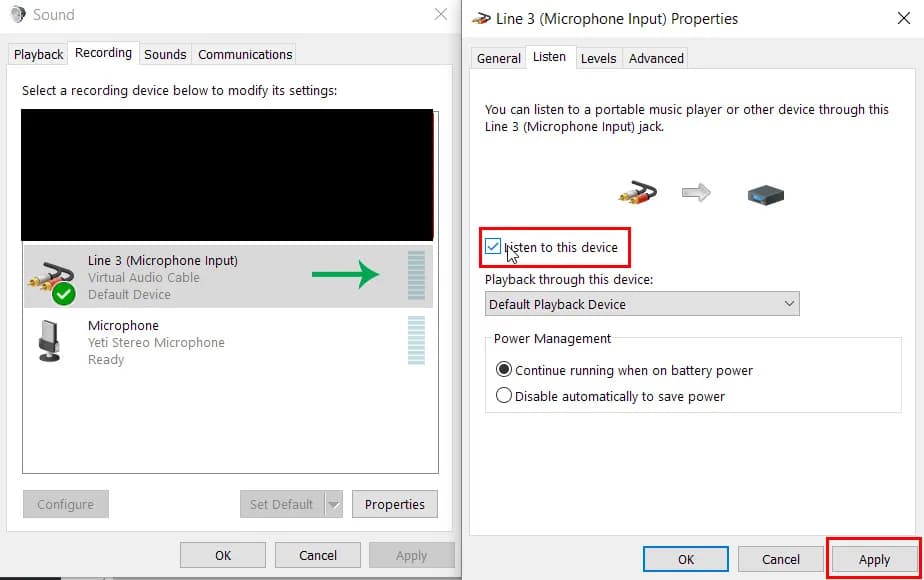
Now go to Windows Sound options, go to the Recording tab, right click on your Virtual Audio Cable Line, click properties, go to the Listen tab and press Listen to this device. You should now hear your microphone output as processed by Adobe Audition. If you do not, then you have done something wrong.

The last step is to make our AutoHotKey script (C:\MyAhkFolder\adobe_audition_microphone.ahk) start with Windows so your microphone's input is always being processed and output to your virtual audio cable.
There are plenty of tutorials on how to do this on the internet.
Here is an easy one to follow:
https://www.autohotkey.com/docs/FAQ.htm#Startup
Good luck!


