Running applications on bare metal
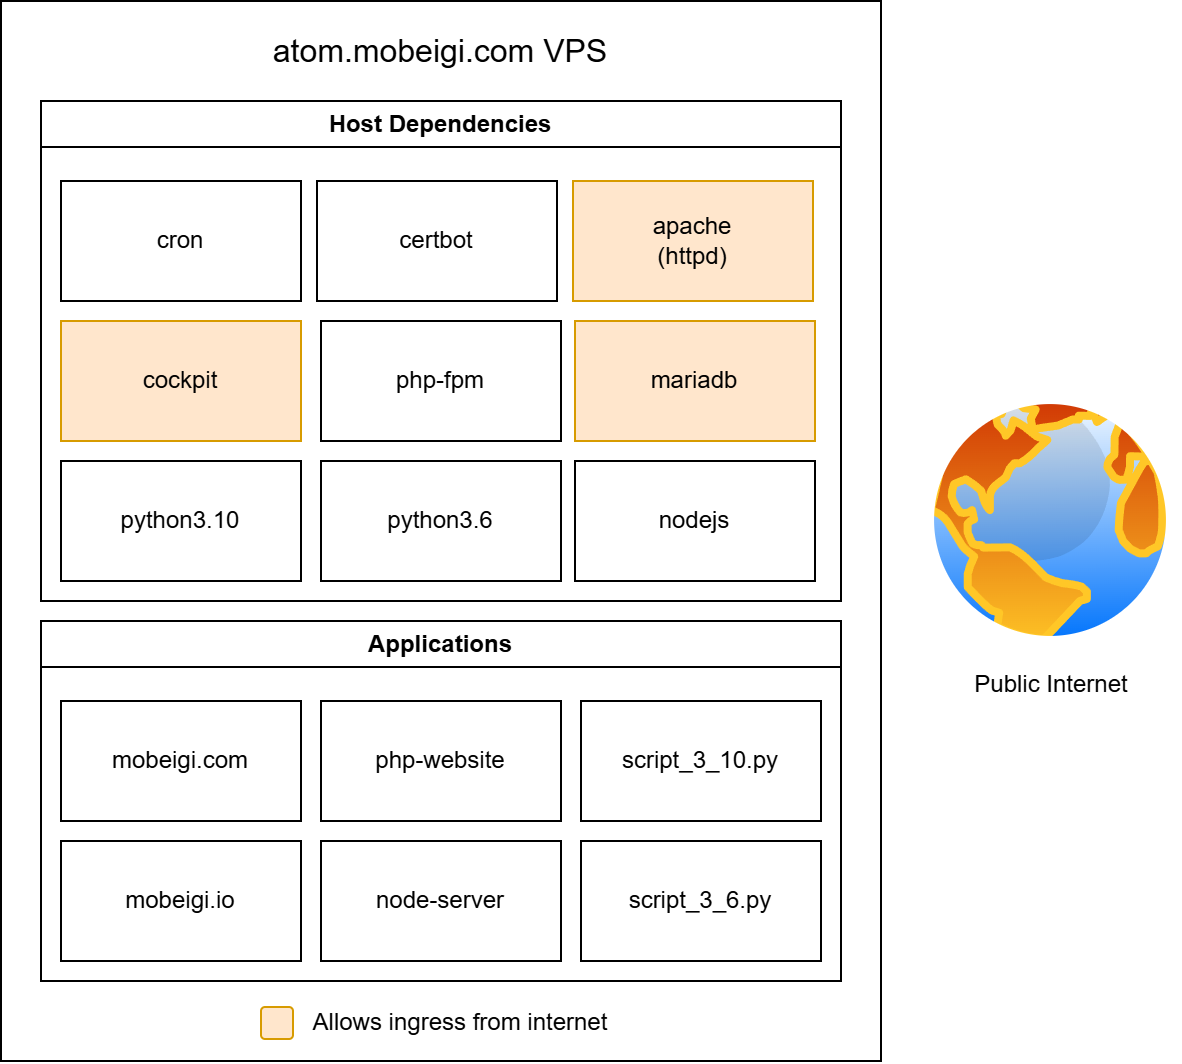
I rented my first VPS back around 2010, when I was only hosting a barebones PHP WordPress website and containerisation technology was still in its infancy. Today, I run several different websites, scripts, cron jobs and other applications from my VPS. Unfortunately, every single application runs on the bare metal (albeit as different users with appropriate permissions). This means that every app is running in the same environment as the host OS.
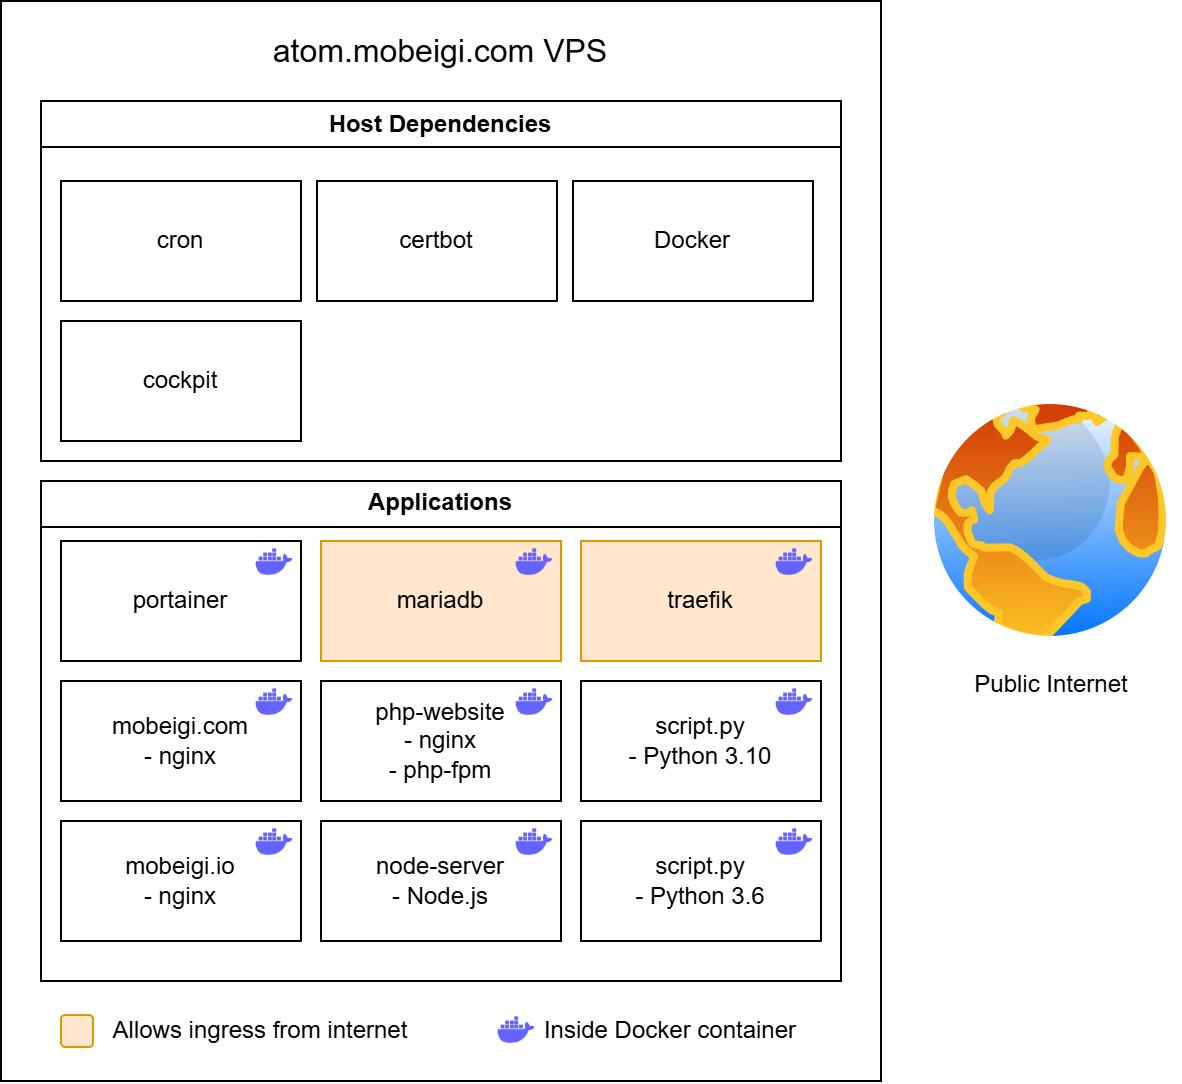
Here is a simple system architecture overview of my VPS:
This has some advantages:
- Performance: No overheads.
- Complexity: As simple as it gets. Even your grandma can set up a LAMP stack on a Ubuntu box.
But also some serious disadvantages:
- Security risks: A compromised app gives the malicious actor direct access to the host OS.
- Isolation: Applications aren’t isolated. Your hello world test123 application written in Zig can see and interact with your credit card provider service. That’s bad.
- Portability: Moving to another VPS host is a PITA! You have to copy all the data and config, reinstall the same packages and make sure you haven’t missed that one config file you tweaked in some obscure directory 12 years ago as you watched Agüero sink in a late title winner.
- Maintenance: Upgrading applications can be manual and break your app without warning. OS updates can break your app. Updating OS software or configs can break another app if they share dependencies.
- Dependencies: Apps on the same host may depend on different versions of popular software (i.e. Python, Node, Apache) and you therefore must maintain multiple environments to support your applications.
I’ve put off migration for a long time because my setup was still very secure and it would take some effort to containerise all 19 applications I run. However, the time has come to migrate.
Docker: the greatest invention since sliced arrays
The goal is to use Docker as our containerisation technology. We will ensure every application is containerised inside of its own container.
This provides several fantastic advantages that eliminate the previous disadvantages:
- Security risks: A compromised app is now self-contained within the container, limiting the blast radius.
- Isolation: Apps can only see and talk to apps that you explicitly allow them to.
- Portability: Back up your config in a git repo, back up your volume data and you can switch to a new VPS provider in under 30 minutes (or your Pizza’s free!).
- Maintenance: It’s easy to upgrade your containers and spin them up / down at will.
- Dependencies: Every container has exactly what it needs in its own environment.
The only two notable downsides are:
- Performance: A container is not as performant as running on bare metal but Docker is extremely performant today. It is highly optimised, extra disk space is a delta compared to the image, CPU/RAM are low at rest. So the minor performance hit is very acceptable. Did I mention my VPS has a 1% load average? So, this is a moot point in my case anyway.
- Complexity: Setting up Docker configuration is more complicated than running things on bare metal. But learning new things is fun, so is this really a con?
Containerising EVERYTHING
Okay, not everything. Some services, like Docker itself, sshd , and system auto-update cron jobs, obviously still remain on the host. I also decided to keep Lets Encrypt’s certbot on bare metal as it was highly recommended by their development team.
We want every application to have its own container. Each container should represent some service that can spin up and serve its purpose.
Consider a typical full stack CRUD application:
- Frontend (i.e. React app)
- Backend (i.e. Kotlin Spring Boot)
- Data (i.e. PostgreSQL)
We have three distinct services here that each serve their own goal but work as a collective to power an application.
Reverse proxy it all with Traefik
Since we’re using containers for everything, we’d ideally like to constrain all container traffic as much as possible. We also don’t want to complicate things by having SSL communications happening in localhost.
Two concepts:
- Every container is docker network only by default.
- Then, localhost if host machine needs access.
- Then, public if internet needs access.
- Every container should be configured to send non-TLS data.
- HTTP or non-tls data over a TCP/UDP port only.
We want to control what ports are exposed on our box.
In my case, only four main ports are exposed overall:
- 22 (sshd)
- 80 (http)
- 443 (https)
- 3306 (mariadb)
- I do some remote DB management sometimes okay, sue me. On a serious note, a better approach is to setup a SSH tunnel to then talk to the DB instead of user/password auth over an open port but I opt for simplicity here as its my personal box. I do use the SSH tunnel approach in all serious projects and professional environments.
Traefik is a reverse proxy designed for containerised applications. We’re using v3.
It handles the following tasks for us:
- Talk to each containerised app in Docker.
- Redirect all incoming HTTP traffic to HTTPs
- Route traffic coming it for our domains to a service (running in docker) and provide the output response back to the caller.
- Set up SSL certificates so each HTTPs response is trusted.
- Shout out to Lets Encrypt for the free & automated certs!
It’s important to note Traefik is not a web server so any static files etc need to be served with some webserver running inside docker (i.e. nginx).
Fun fact: Traefik itself runs inside of a Docker container!
Restricting docker containers to localhost
A Dockerfile responsible for building a service that might serve data by exposing some port.
|
1 2 3 4 5 6 7 |
FROM nginx:alpine # Build & prep here... EXPOSE 80 CMD ["nginx", "-g", "daemon off;"] |
In compose.yml files, this exposed port can then be changed / mapped differently.
One common option is:
|
1 |
ports: [] |
By using this, or omitting the ports field, we indicate we don’t want the host to access this Docker container. Only the docker network will be used for communication between this container and other containers.
Another common option is:
|
1 2 |
ports: - "8123:80" |
In this case we explicitly map port 8123 on the host to port 80 in the container. This lets us access the served nginx web traffic.
Another option is:
|
1 2 |
ports: - "80" |
In this case, we’re only specifying we want to reach port 80 in the container. Docker will automatically assign an unused port on the host machine. For example, it could choose port 54613.
Now, ideally we’d like to avoid hard coding the port mappings on the host. This is because only 1 host port can be mapped at a time and if you decide to map this yourself, you have to keep track of the ports and make sure you don’t reuse them etc. Instead, let Docker randomly map it for you and use docker CLI commands to find the port at runtime.
In my setup, I use a base compose.yml to setup each container (this one is barebones and likely looks like the example one from repo documentation). Then I use a secondary compose.override.yml to override various config. I use the overrides to setup the Traefik labels for the container, networks as well as the ports. This has the added benefit of ensuring the base compose.yml can be used for local development and testing without any modifications.
Finally, this is how I might restrict the port to localhost for this nginx app:
|
1 2 3 4 5 6 7 8 |
services: nginx: labels: - traefik.enable=true - traefik.http.routers.mobeigi-com-app.rule=Host(`mobeigi.com`) || Host(`www.mobeigi.com`) - traefik.http.routers.mobeigi-com-app.middlewares=redirect-www-to-non-www@file ports: !override - "127.0.0.1::80" |
Note the use of !override, this is needed to override previous port settings because Docker simply adds / combines multi-valued fields when using Docker Compose with multiple compose files. The use of !override ensures the previously specified port in our base compose.yml is not used.
127.0.0.1::80 is equivalent to 127.0.0.1:0:80. We’re ensuring the port is only accessible on the localhost interface and not 0.0.0.0 (all interfaces). We omit the host port (or use 0) to tell Docker we’d like to map a random host port and finally we specify the port on the container we’d like to access.
Make sure to check which ports are mapped to all interfaces so you don’t accidentally expose an application directly to the world instead of through Traefik:
|
1 2 |
[root@atom ~]# docker ps | grep '0.0.0.0' [root@atom ~]# |
This is useful because malicious actors use automated port scanning to find attack vectors. If your app is available on an open port on your server IP, it might attract probing, which is undesirable, especially if the app has a vulnerability.
You can use a tool like Censys to scan your servers IP to find any public ports and see what malicious actors can use against you.
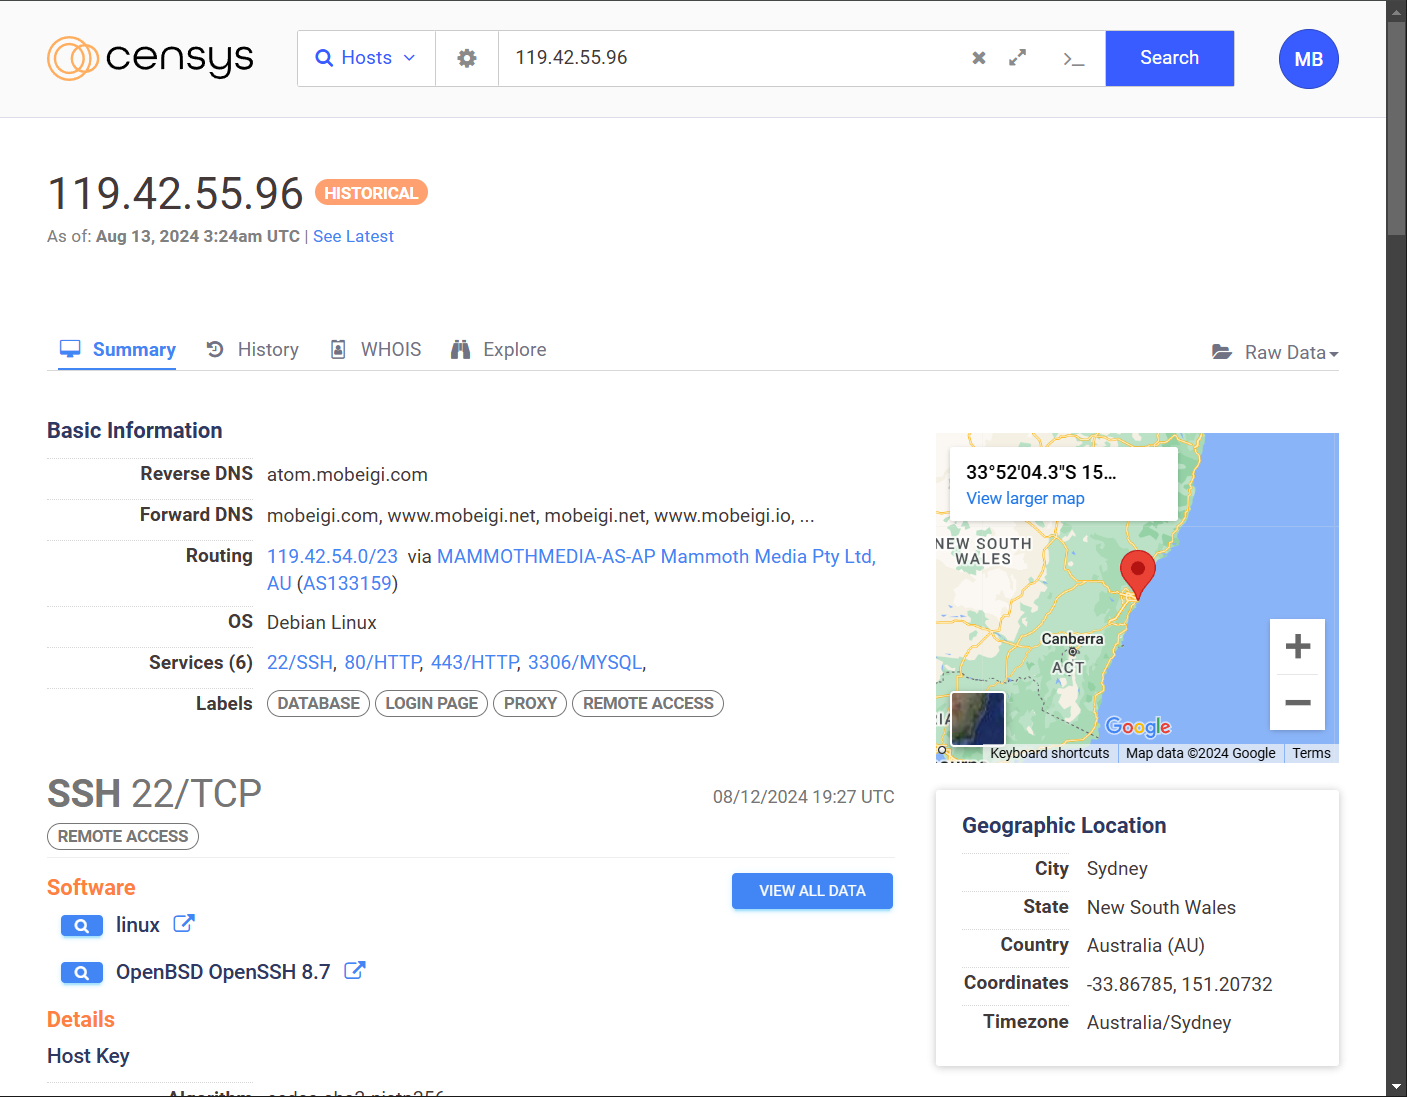
Pro tip: You should run Censys against your home network IP address if you host any applications (i.e. security cameras or private web server) on a NAS or other local machines.
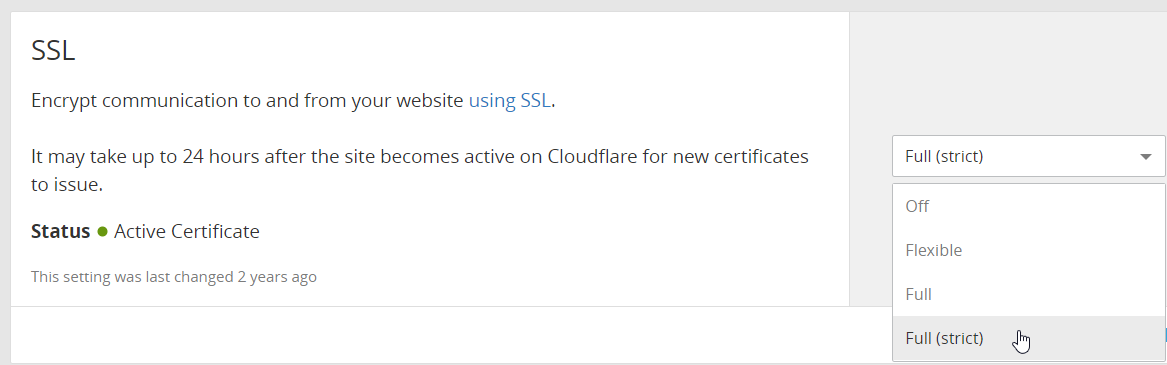
Setting up SSL Certificates
This one is very easy (almost too easy…), simply define all your certificate files in the traefik_dynamic.yml.
|
1 2 3 4 |
tls: certificates: - certFile: "/etc/letsencrypt/live/mobeigi.com/fullchain.pem" keyFile: "/etc/letsencrypt/live/mobeigi.com/privkey.pem" |
Redirecting HTTP to HTTPS
My websites don’t support HTTP at all. Every website I serve is HTTPs only. Sorry I don’t make the rules, I just enforce them.
For this reason, we use some nice middleware in our traefik_static.yml that lets us redirect HTTP to HTTPS:
|
1 2 3 4 5 6 7 8 9 10 11 12 13 14 |
entrypoints: http: address: ":80" http: redirections: entrypoint: to: https scheme: https https: address: ":443" http: tls: true asDefault: true |
Now each compose file can use labels to invoke this middleware:
|
1 2 3 4 5 6 |
services: nginx: labels: - traefik.enable=true - traefik.http.routers.mobeigi-com-app.rule=Host(`mobeigi.com`) || Host(`www.mobeigi.com`) - traefik.http.routers.mobeigi-com-app.middlewares=redirect-www-to-non-www@file |
Redirecting www and non-www
Depending on the website, I usually also like to redirect www to non-www or vice versa.
This is the middleware I use for this in my
traefik_dynamic.yml:
|
1 2 3 4 5 6 7 8 9 10 11 12 |
http: redirect-www-to-non-www: redirectRegex: regex: ^(https?://)www\.(.*) replacement: ${1}${2} permanent: true redirect-non-www-to-www: redirectRegex: regex: ^(https?://)(?!www\.)(.*) replacement: ${1}www.${2} permanent: true |
Invoked by labels:
|
1 2 3 4 5 |
# www to non-www - traefik.http.routers.mobeigi-com-app.middlewares=redirect-www-to-non-www@file # non-www to www - traefik.http.routers.mobeigi-com-app.middlewares=redirect-non-www-to-www@file |
Letting Traefik route to services on the host
You might find you need Traefik to route to services on the host that aren’t run inside of docker.
For example, my Centos distribution comes with cockpit built in. I would like to expose it at cockpit.mobeigi.com through Traefik but how do I reach it on the host.
In Linux, its best practice to bind host.docker.internal to host-gateway inside your compose.yml then use that hostname to refer to the host machine from inside your docker containers. Here is an example for Traefik:
|
1 2 3 4 5 6 7 8 9 10 11 12 13 |
services: traefik: image: traefik:v3.1 ports: - "80:80" - "443:443" volumes: - /var/run/docker.sock:/var/run/docker.sock:ro - ./traefik_static.yml:/etc/traefik/traefik.yml - ./traefik_dynamic.yml:/etc/traefik/traefik_dynamic.yml extra_hosts: - "host.docker.internal:host-gateway" restart: unless-stopped |
Now we can add some config to our traefik_dynamic.yml to route to our service:
|
1 2 3 4 5 6 7 8 9 10 11 12 13 14 15 |
# Cockpit that comes with Centos http: routers: cockpit: rule: "Host(`cockpit.mobeigi.com`)" entrypoints: - https tls: true service: cockpit-service services: cockpit-service: loadBalancer: servers: - url: "http://host.docker.internal:9090" |
And boom, cockpit.mobeigi.com is being routed through Traefik inside Docker to the host and back, served with HTTPs!
Note: Additional configuration is needed for this specific case for cockpit, please see this post.
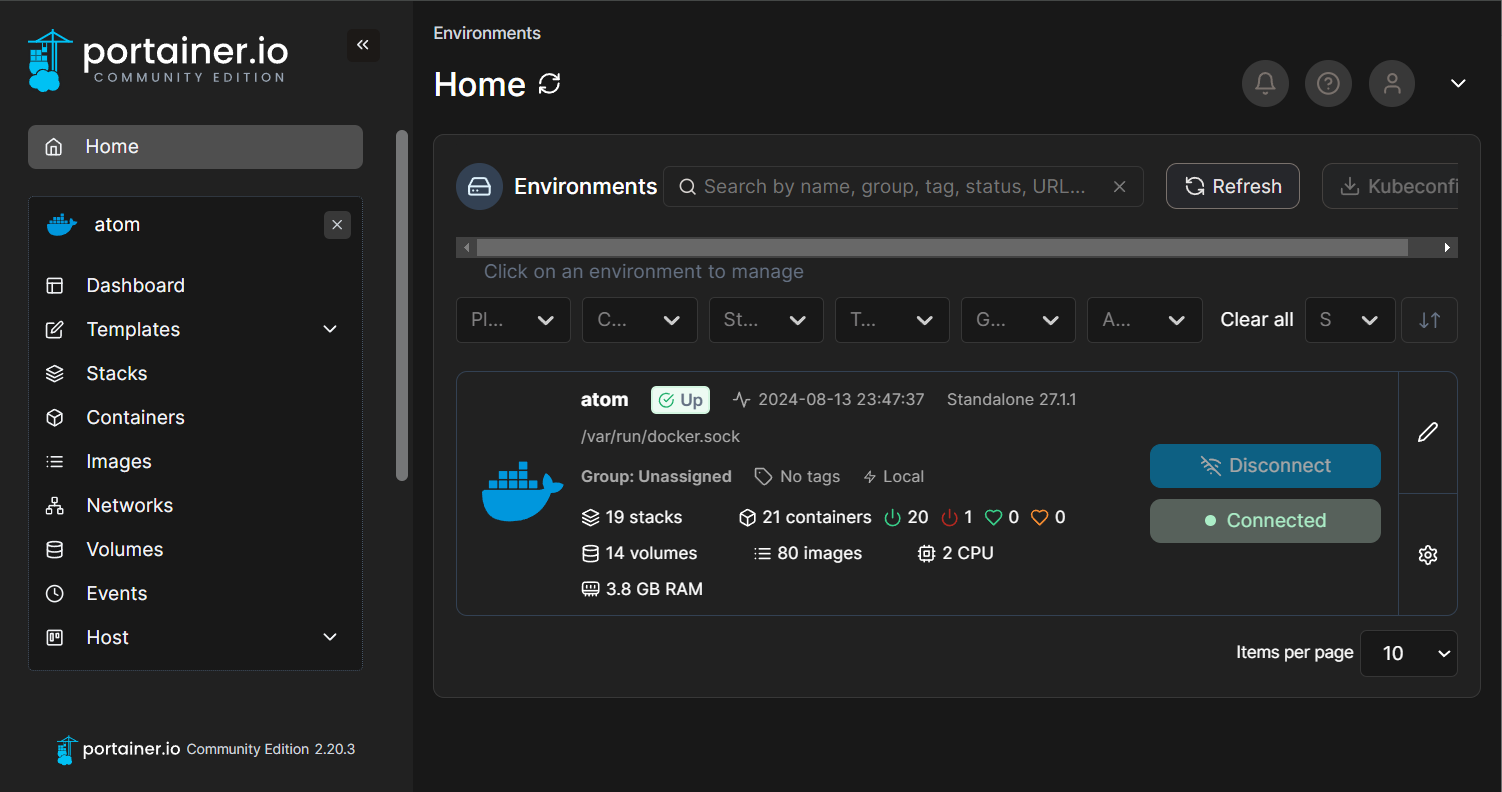
Docker Container Management
An optional but very nice tool to utilise is Portainer.
It is a Docker container that provides a web interface to:
- Manage docker containers
- Start/Stop/Restart/Spawn docker containers
- See logs for container
- Shell into container
I run it at: portainer.mobeigi.com
I’m a big fan (not literally, I’m a human but I enjoy the product nonetheless).
Final thoughts
After all is said and done, here is the new system architecture overview of my VPS:
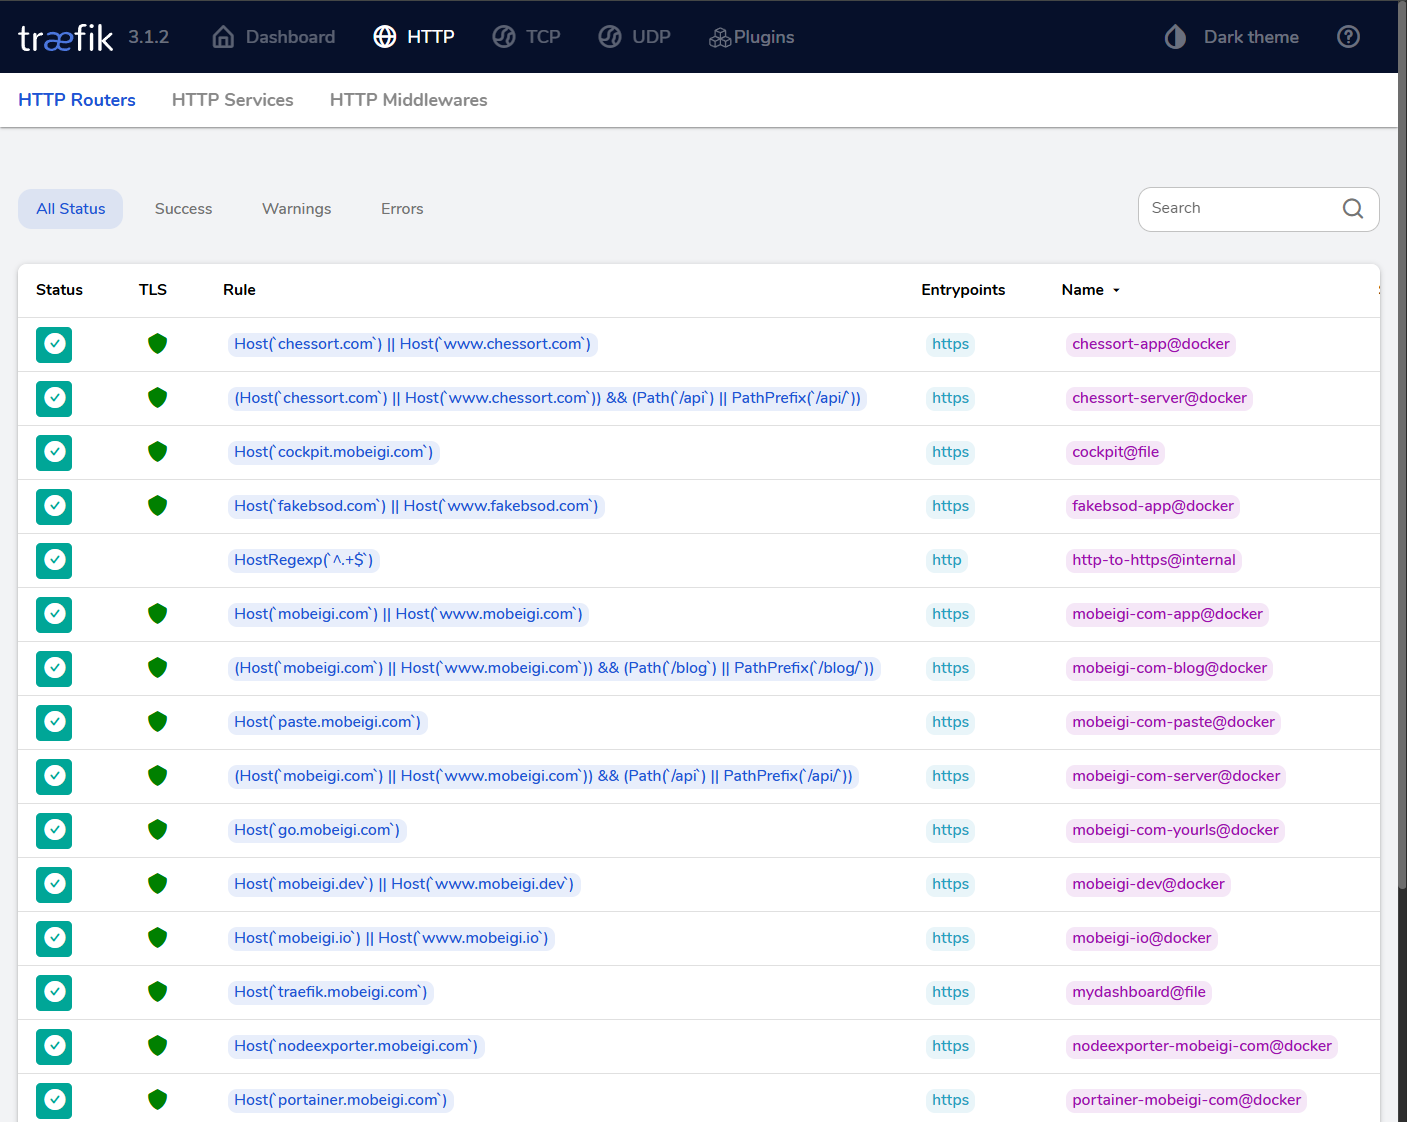
Here is what the Traefik dashboard looks like at traefik.mobeigi.com:
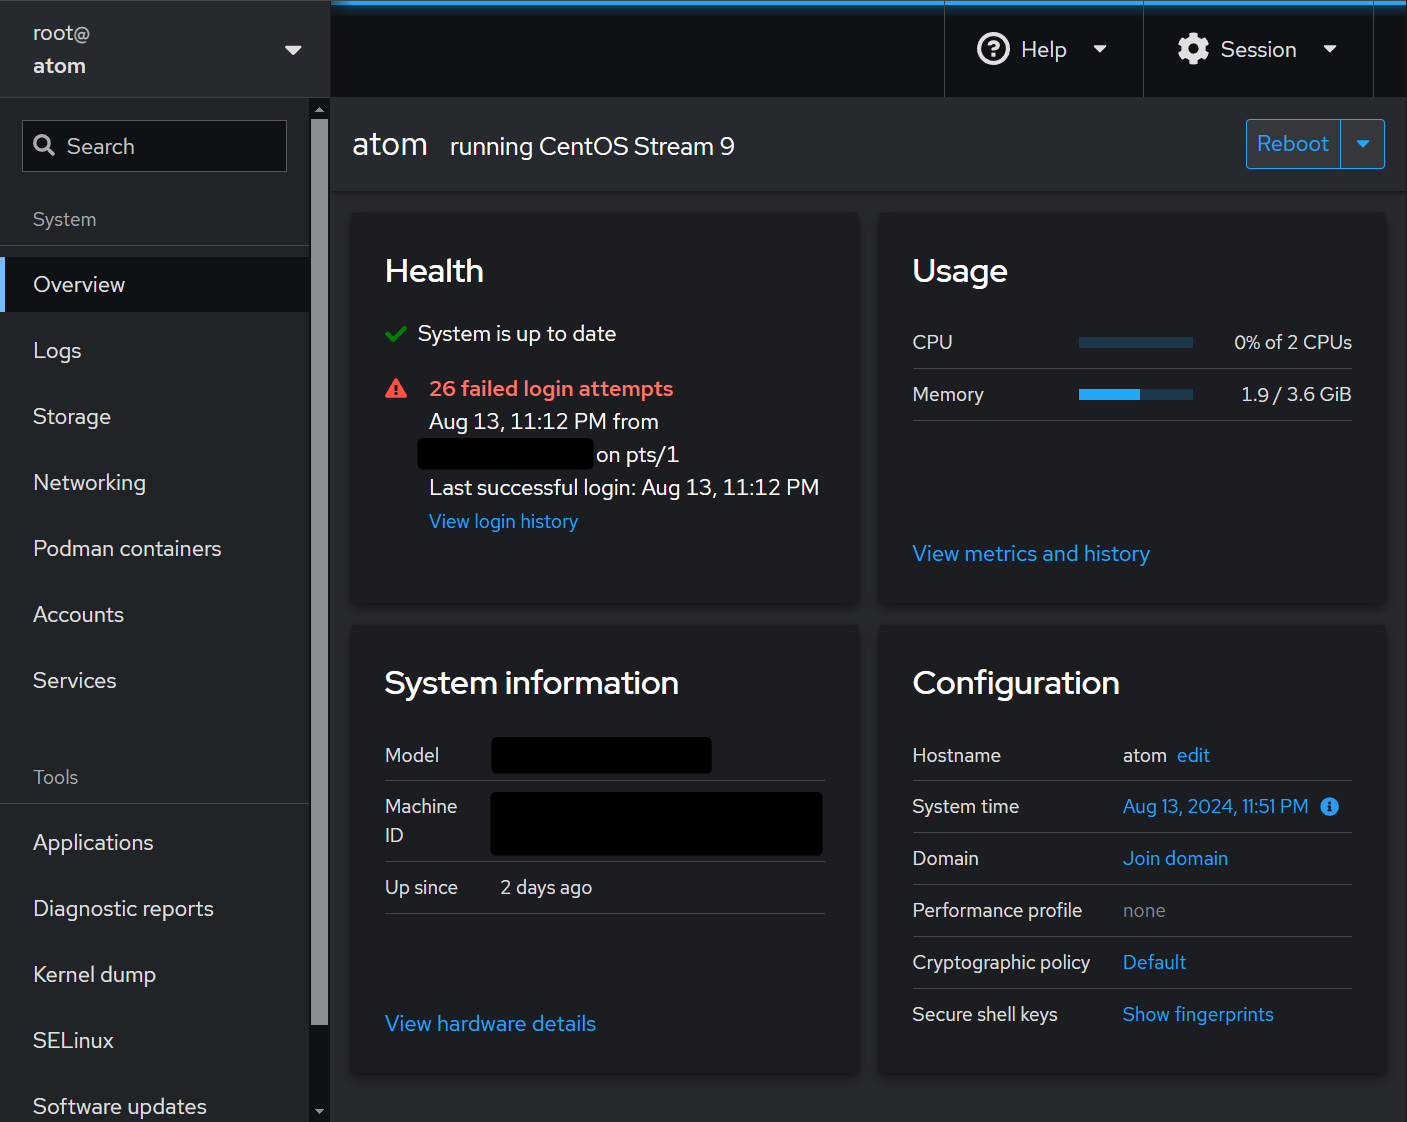
In terms of resource usage, here is a before snapshot:
|
1 2 3 4 5 6 7 8 9 10 |
[root@atom ]# free -m total used free shared buff/cache available Mem: 3658 1648 791 110 1610 2009 Swap: 3071 0 3071 [root@atom]# uptime | awk -F'load average: ' '{print $2}' 0.01, 0.01, 0.00 [root@atom]# df -H | grep atom /dev/mapper/cs_atom-root 28G 21G 7.1G 75% / |
After the migration we have:
|
1 2 3 4 5 6 7 8 9 10 |
[root@atom ]# free -m total used free shared buff/cache available Mem: 3658 1618 814 78 1594 2039 Swap: 3071 353 2718 [root@atom]# uptime | awk -F'load average: ' '{print $2}' 0.01, 0.01, 0.00 [root@atom]# df -H | grep atom /dev/mapper/cs_atom-root 28G 23G 5.1G 81% / |
As you can see, we’re only using an additional 2GB of storage space (for images). CPU and memory usage are the same.
Recap:
- Everything is containerised.
- Traefik reverse proxy handles SSL and serves HTTPs.
- Only the few necessary ports exposed.
- We now run some cool Docker management tools like Portainer.
- We moved away from apache to nginx for most websites and yielded small (~5%) performance improvements!